Driver, BIOS, and firmware updates

Driver, BIOS, and firmware updates

If a specific hardware part of your computer is not working correctly, updating “drivers”, “BIOS”, or “firmware” is worth trying to attempt to fix the problem.

Before proceeding with the instructions, save whatever documents you are working on. You will likely need to restart your computer to install updates.

My computer is a:

iSchool issued Lenovo


update drivers on an iSchool issued Lenovo

1) Click the lower-left Windows icon to bring up the Start menu.


2) Start typing the words “system update.” Click the System Update icon to start the application.

search_for_system_update


3) Click Next, the application will search for updates applicable to your computer. If there is an update available for the Lenovo System Update application itself, follow the on-screen instructions to apply the update.

system_update_next


4) Once search results appear, for the “Critical updates” and “Recommended updates” sections, select only the items that have the words “Thunderbolt” or “Driver” or “BIOS” or “Firmware” in the title. Click Next.

note: The picture below is an example. The updates that appear for your specific computer will likely be different from what is pictured below. Select only the items that have the words “Thunderbolt” or “Driver” or “BIOS” or “Firmware” in the title.

driver_bios_updates


5) Click Download.

download_selected_drivers


6) The selected items will be downloaded and installed. Follow any specific on-screen instructions presented.

download_and_install_progress


7) When the installation is finished, you may be prompted to restart the computer. Follow the specific on-screen instructions.

restart_if_needed

Edit your Office 365 Profile

SharePoint has many social features. Ever since the iSchool decided to adopt SharePoint as our collaboration tool we decided to make our Intranet as personable as possible to facilitate said collaboration.

As iSchool Staff, here is what we would like you to do.

1) Browse to here:

https://portal.office.com/Home

and log in.

2) Click on the picture (or buddy icon if there is no picture) in the top, right corner.

3) Click the “About me” link.

4) Upload a picture of yourself (you can use your iSchool staff picture if you like).

5) Optionally, you can also edit your Profile to add additional information.

Being able to put a face to a name goes a long way toward achieving the goal of making our Intranet more personable. Your picture, and any information you add to your Profile and make viewable by everyone, will be displayed under the “People” links on our Intranet.

Use SecureCRT for accessing Keynes

The application SecureCRT should be used for accessing Keynes.  Download SecureCRT from this webpage:

https://itconnect.uw.edu/wares/uware/securecrt-software/

Download and install the most current 64-bit version.

Due to licensing restrictions, SecureCRT is not something we can work into the iSchool software image so you will need to install it yourself if you need it.

Alternatives to Adobe Acrobat Pro

Alternatives to Adobe Acrobat Pro

There are many tasks with PDF’s that can be performed without Adobe Acrobat Pro. Some of the most common tasks are:

Edit a PDF using Microsoft Word
Create a PDF from a Microsoft Office application
Saving an email as a PDF
Sign a PDF
Split or break up a PDF
Combine multiple PDFs
Create a PDF from a web page using Google Chrome
Use Optical Character Recognition (OCR) in Microsoft OneNote


How to edit a PDF with Microsoft Word

Windows 10

Word includes the ability to convert a PDF to a Word document, allowing you to then edit the content:
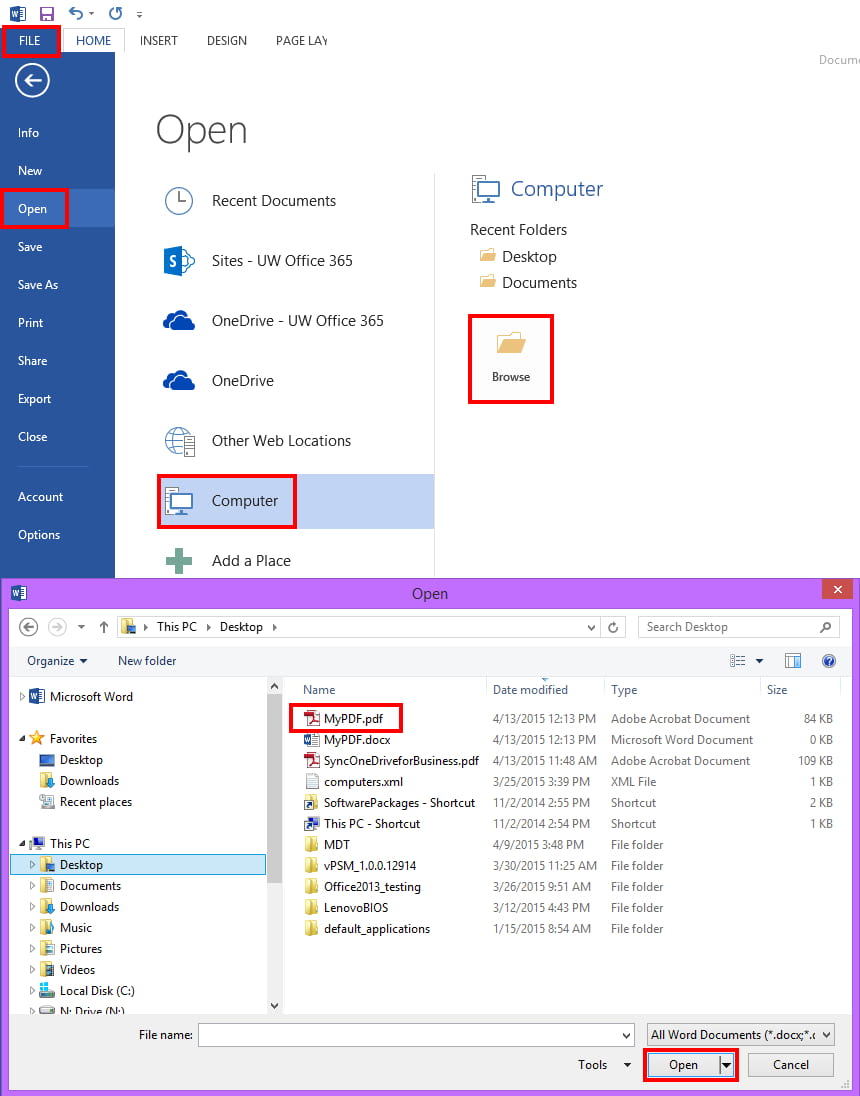
1) start Word

2) click File, click Open, navigate and find the PDF you wish to edit, click Open

Open PDF Word 2013


3) a message will appear letting you know the converted-and-editable-document may not look perfectly like the original, but, you will be able to use and edit the original content

Open PDF Word 2013 Message

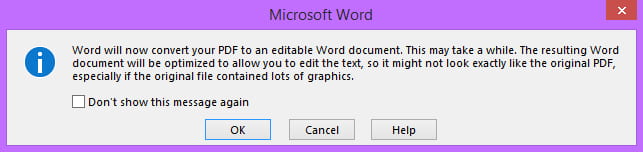
This works best with files that are mostly text. There are some elements that do not convert well.

More information about editing PDF’s in Word can be found at these websites:

Edit PDF content in Word
Unlock PDFs with Word 2013
Why does my PDF look different in Word?


How to create a PDF using a Microsoft Office application

Although the following instructions are specific to Word, they work for other Office applications like Excel, Visio, etc.

1) create the document in a Microsoft Office application

2) click File, click Save As, click the “Save as type:” drop-down, select PDF (*.pdf), click Save

Save As PDF


How to save an email as a PDF

Outlook does not include a way to save an email directly to PDF. You must first copy the contents of the email to a Word document, then save the document as a PDF.

1) open the message in Outlook

a. (optional) if you want to include the subject and “To” and “From” email address information: click Reply (you will not actually need to reply to the email)

2) on your keyboard, press CTRL and A to select all message content

3) on your keyboard, press CTRL and C to copy selected message content

4) start Word and create a new document

5) on your keyboard, press CTRL and V to paste selected message content

6) click File, click Save As, click the “Save as type:” drop-down, select PDF (*.pdf), click Save

Save As PDF


How to sign a PDF using Adobe Acrobat Reader (free application)

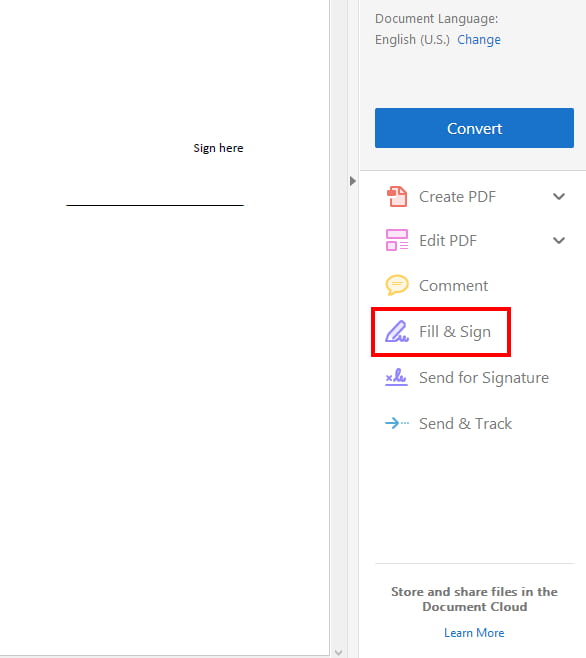
1) open the document you need to sign with Adobe Acrobat Reader

2) click Fill & Sign

Adobe Reader Fill Sign Button


3) click Sign, click Add Signature

Adobe Reader Add Signature


4) select the option of typing or drawing your signature, enter your signature, select the option of saving your signature for later use, click Apply

Adobe Reader Apply Signature


5) position the signature, click File, click Save to save the document with your signature

Adobe Reader Position Signature


How to split or break up a PDF

There are a few ways to split or break up a PDF:

Split a PDF using Microsoft Word
Split a PDF using the Google Chrome web browser

How to split or break up a PDF using Word

1) open the PDF in Word

2) copy whatever content you need, paste content into a new Word document

3) save the new document as a PDF


How to split or break up a PDF using the Google Chrome web browser

1) start the Google Chrome application

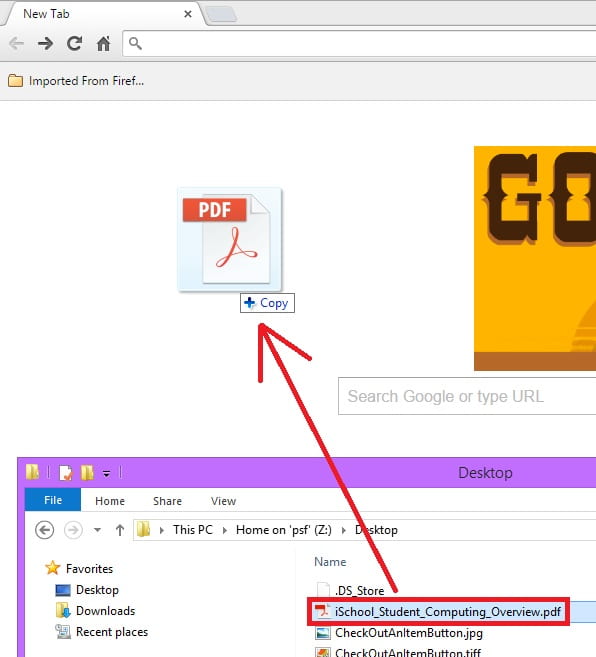
2) find the PDF in a Windows Explorer folder, click and drag the PDF into Google Chrome to open it

Open PDF in Google Chrome


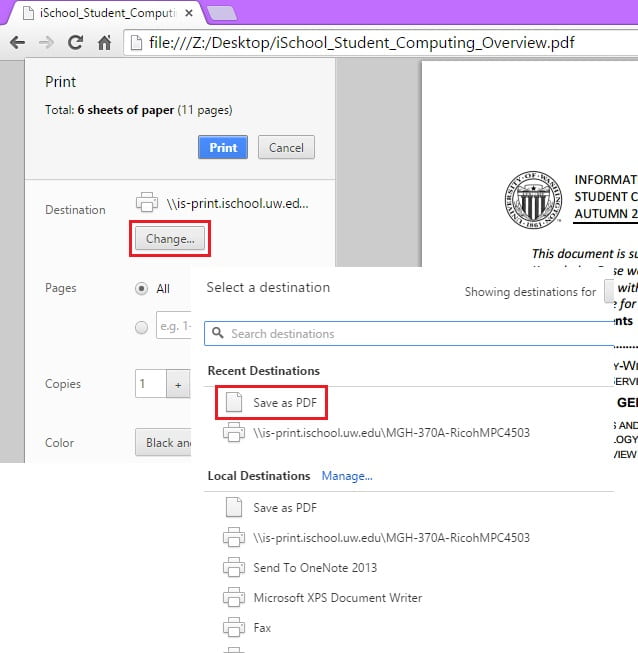
3) bring your mouse to the bottom of the screen to bring up the menu buttons, click the Print button

Menu Google Chrome


4) click Change… (destination), click Save as PDF

Save As PDF Google Chrome 01


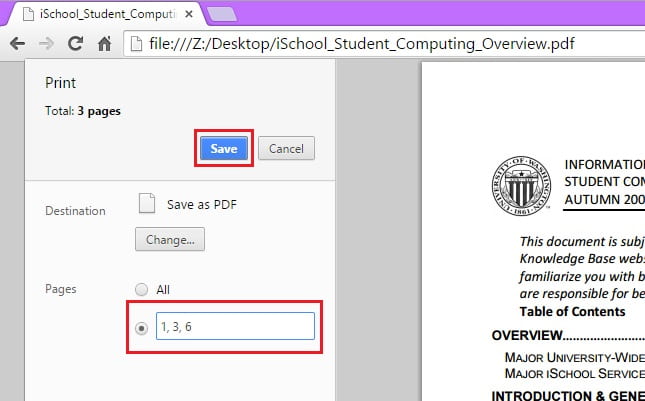
5) enter the specific pages or range of pages you need, click Save

Save As PDF Google Chrome 02


How to combine PDFs

1) open the PDFs in Word

2) copy and paste the contents of each PDF into a new Word document

3) save the new document as a PDF


How to create a PDF from a web page using Google Chrome

1) use Google Chrome to navigate to the web page you intend to create a PDF of

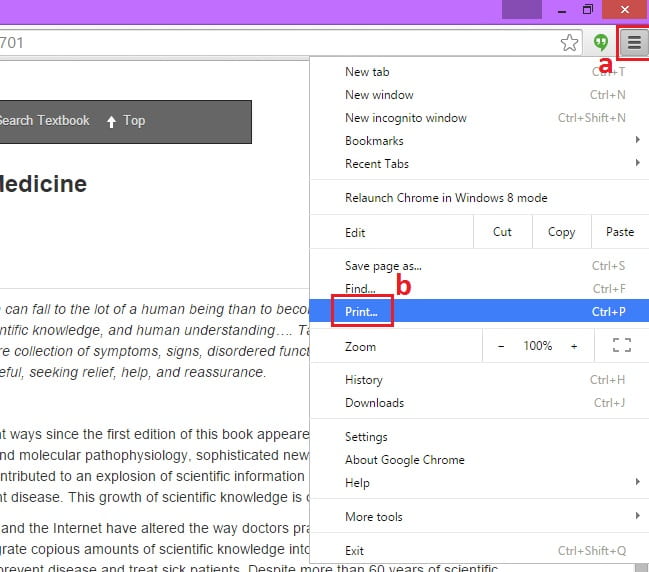
2) click the top-right Chrome menu button, click Print…

Save Web Page As PDF Google Chrome 01


3) for Destination click Change…, select Save as PDF, click Save

Save As PDF Google Chrome 01


How to use Optical Character Recognition (OCR) in Microsoft OneNote, Windows Version

Microsoft OneNote, Windows version, has the ability to extract text from scanned images.

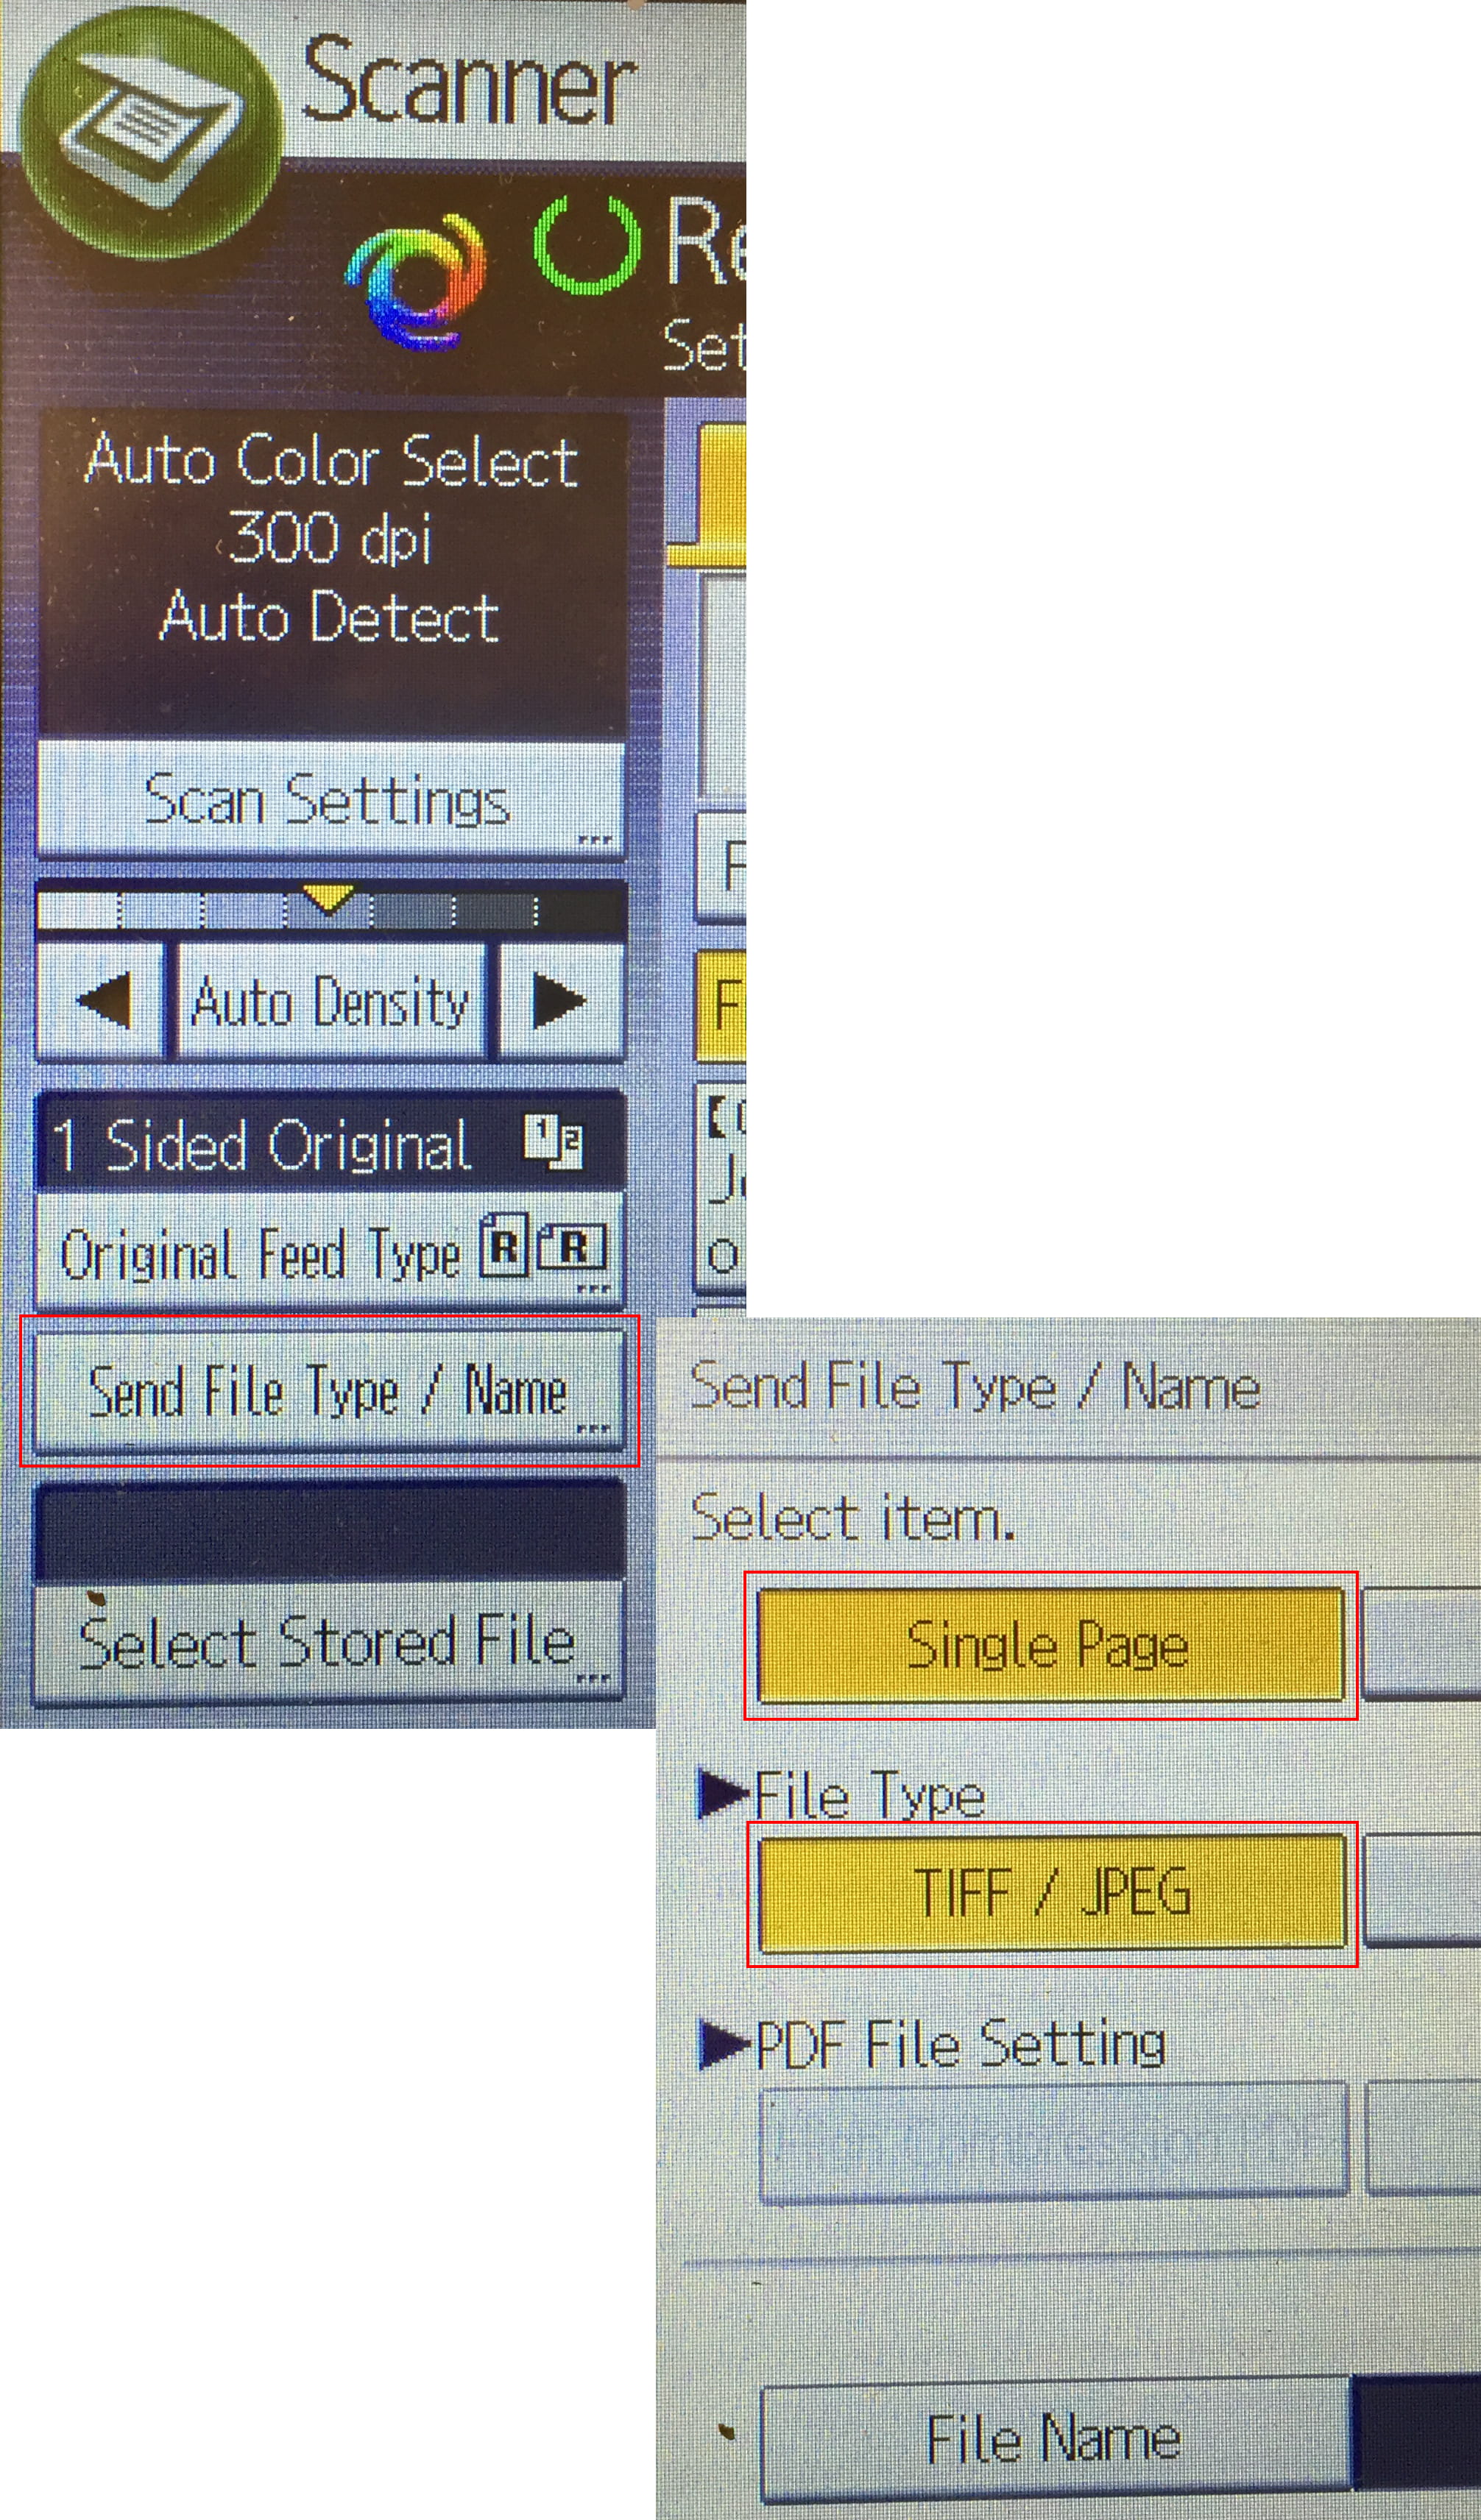
1) Scan the document you intend to use as a TIFF/JPEG image. On iSchool Ricoh scanners, this option can be set in the Scanner menu -> Send File Type / Name… -> Single Page -> TIFF / JPEG

Ricoh Scan To TIFF/JPEG


2) start Microsoft OneNote in Windows, create a new notebook

OneNote, Windows, Create Notebook


3) click the plus sign to create a new section

OneNote, Windows, Create Section


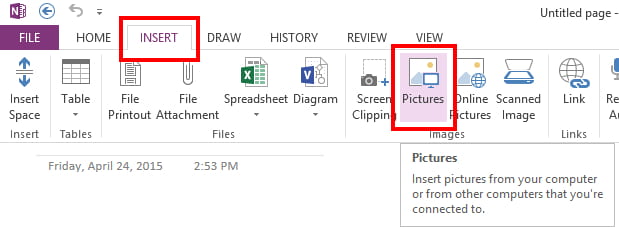
4) click Insert, click Pictures, find and select the image you scanned in step 1

OneNote, Windows, Insert Picture


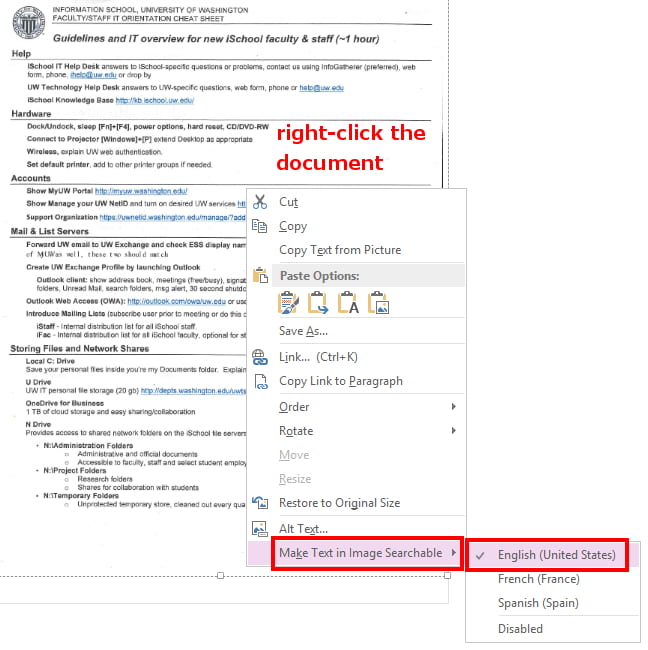
5) right-click the document, select Make Text in Image Searchable, select the language

OneNote, Windows, Make Image Text Searchable


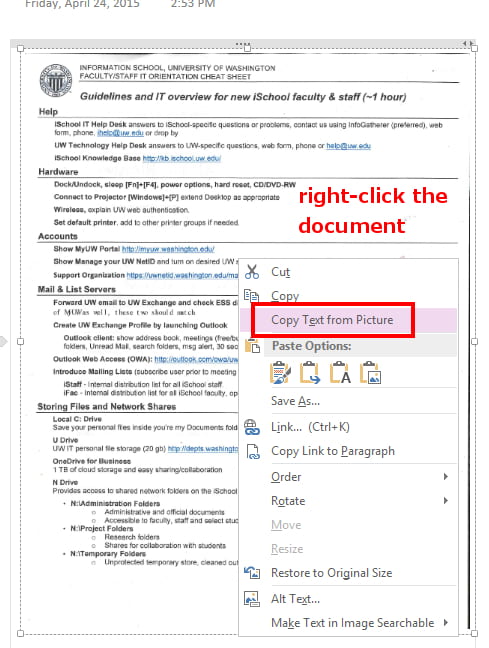
6) right-click the document, click Copy Text from Picture

OneNote, Windows, Copy Image Text


7) start Word, paste the text into a document, whatever text was able-to-be-copied from the image will be available in the document

Paste Image-Text Into Word Document


Note: This method strips all formatting leaving you with only editable text.

How to install software downloaded from the Microsot Azure Dev Tools for Teaching site

How to install software downloaded from the Microsot Azure Dev Tools for Teaching site

Some software downloaded from the Microsoft Azure Dev Tools site are in the form of .iso files. It is not necessary to burn these files to a CD or DVD in order to install the software.

.iso files can be “extracted” to get to individual files, like the setup.exe installer file, using a free program like 7-Zip:

1) download and install the free program named 7-Zip:

http://www.7-zip.org/

2) right-click the .iso file downloaded from the Microsoft Azure Dev Tool software site, move the mouse pointer over 7-Zip, click Extract files…

right_click_extract_files

3) click OK

extract_ok

7-Zip will “extract” the contents of the .iso file and leave you with a folder full of files.

4) double-click the just-created-folder, double-click the installer file (usually setup.exe) to run through the software installation

double-click_setup.exe_file

Digital Signatures in Microsoft Word

Digital Signatures in Microsoft Word

The purpose of a digital signature is the same as your handwritten signature.  Compared to a handwritten signature, it is considered significantly more difficult to forge a digital signature. A valid digital signatures assures the recipient of your document that:

  • Authentication – you are the sender of your document
  • Integrity – the document has not been altered since you signed it
  • Non-repudiation – you can’t deny the authenticity of the document

Digital Signatures are a great tool to keep your documents secure, and to keep your data electronic to avoid wasting paper.


There are different ways to approach adding a digital signature to a Microsoft Office document. Full Microsoft instructions can be found on the following websites:

Insert a signature

Add or remove a digital signature in Office files

LanSchool

LanSchool

LanSchool is computer-classroom management software. With LanSchool, teachers can observe and control students’ computers.

LanSchool is available in the computer classrooms in Mary Gates Hall room 430, Mary Gates Hall room 334, Mary Gates Hall room 082, and Mary Gates Hall room 076.

————–

If you would like to install the “Teacher” version of LanSchool on your computer, please contact the iSchool IT Help Desk.

Note well:

  1. During the installation, you will be asked for the “channel.”  Type the number of the classroom you are teaching in.  For example, if you are teaching in MGH-430, enter “430” for the “channel” during installation.
  2. When you are in the classroom teaching, your computer must be physically connected to the ethernet/Internet in the classroom.  Wi-Fi is not sufficient.

————–

Special note for teachers in Mary Gates Hall room 430: the LanSchool Teacher Console is only installed on the Mac operating system. You are able to share both your Mac and Windows operating system screens with students, but you can only access the LanSchool controls from the Mac side. If you are in the Windows operating system, move your mouse pointer down to the bottom of the screen to bring up the Mac dock and you will be able to access the LanSchool Teacher Console.

LanSchool has helpful video tutorials on the following site:

https://www.lenovosoftware.com/lanschool/training

Yammer Desktop Notifier

Yammer is a Microsoft product that lets you communicate (think social networking) in various communities and to create your own communities.

By signing up with your UW email address you can join the UW Yammer community.

To get all your Yammer notifications without needing to be logged in via a web browser you can install the Yammer Desktop Notifier here:

https://about.yammer.com/product/desktop-application/

How to use TeamViewer for remote IT support

How to use TeamViewer for remote IT support

TeamViewer is a program that makes it possible for the iSchool IT Help Desk to see and control your computer, wherever it may be, allowing for easier remote support. To use TeamViewer:

Mac
Windows

Use TeamViewer on macOS

1. Start Finder, click Applications, double-click TeamViewer QuickSupport.app

1a. If TeamViewer QuickSupport.app is not in the Applications folder you can download it from:

https://get.teamviewer.com/ischool

2. Once started, the TeamViewer application generates two numbers. The iSchool IT Help Desk will need these numbers to remotely connect to your computer.

Use TeamViewer on Windows

1. Click the lower-left Windows icon (A), start typing TeamViewer (B), click the search result named TeamViewerQS.

Start TeamViewer on an iSchool Windows Computer

1a. If TeamViewer QS.exe (could also be named TeamViewer QuickSupport.exe) is not already on your computer, you can download it from:

https://get.teamviewer.com/ischool

2. Once started, the TeamViewer application generates two numbers. The iSchool IT Help Desk will need these numbers to remotely connect to your computer.