How to share your Outlook (read: Exchange) Calendar with others at the UW and with External Users

How to share your Outlook (read: Exchange) Calendar with others at the UW and with External Users

Before you proceed, note that by default everyone at the iSchool (and everyone else at the UW that uses the UW Microsoft 365/Office 365 service) can already see the default free/busy info of everyone else. This means people can already see when you are free, when you are busy, what your working hours are and when you are out of the office.

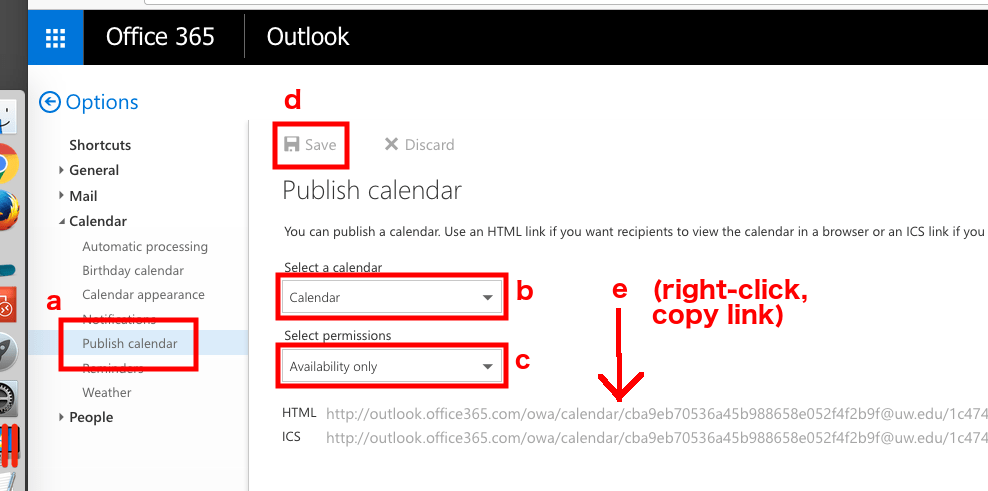
“Advanced” sharing options are possible if you want to give someone access to more details. This could be allowing someone outside of UW the chance to view to your calendar, or if you want to give someone “delegate” (edit) rights to your calendar.

It is recommended that you configure “advanced” sharing options using the Outlook Web App. Detailed directions from Microsoft are available on this web page: Advanced Microsoft 365 Calendar sharing directions.

Canvas Knowledge Base

Canvas is the Learning Management System adopted by the University of Washington and the iSchool. It began to be used in Autumn 2011. It is widely used to communicate with students in all areas related to coursework (syllabi, assignments, grading, etc.).

The Online Learning Team maintains a fantastic course about using Canvas and related technologies here. On this page, you can find resources and tutorials to help you navigate your way through the tools used as part of online learning at the iSchool.

Need help with Canvas specifically? Check out our Canvas for Instructors area at: https://sites.google.com/uw.edu/ischool-learningtech/home.

Faculty teaching for the Information School can enlist help from the Online Learning Team by emailing olt@uw.edu.

In addition to the above resources, you can also get help with Canvas at:

UW IT Canvas Guide
Guides from Instructure, the company that makes Canvas

How to connect to your computer via Remote Desktop using the iSchool Remote Desktop Gateway

How to connect to your computer via Remote Desktop using the iSchool Remote Desktop Gateway

If your iSchool issued work computer is running Windows, it is possible to connect to it and use it remotely, from a separate computer.

If your iSchool issued work computer is a Mac and you are looking to connect to it and use it remotely, see this page.

In order to access your iSchool Windows work computer remotely:

a) You need to know your computer’s name.
b) The computer must allow remote connections.
c) The computer must be powered on and not in sleep mode.
d) The computer must be connected to the UW campus network.

After confirming a through d above, follow these instructions to access your Windows work computer from a separate computer.

How to find your iSchool computer name

Windows 10

Windows 10

1) Right-click the lower-left Windows icon, click System.

Your computer’s name is next to “Device name” or “Computer name:” (depending on Windows 10 version) and usually something like “is-YourNetIDx220” or “is-YourNetID450” or “is-YourNetID360” or “is-YourNetIDx1c.”

Confirm your iSchool work computer will allow remote connections

Windows 10

Windows 10

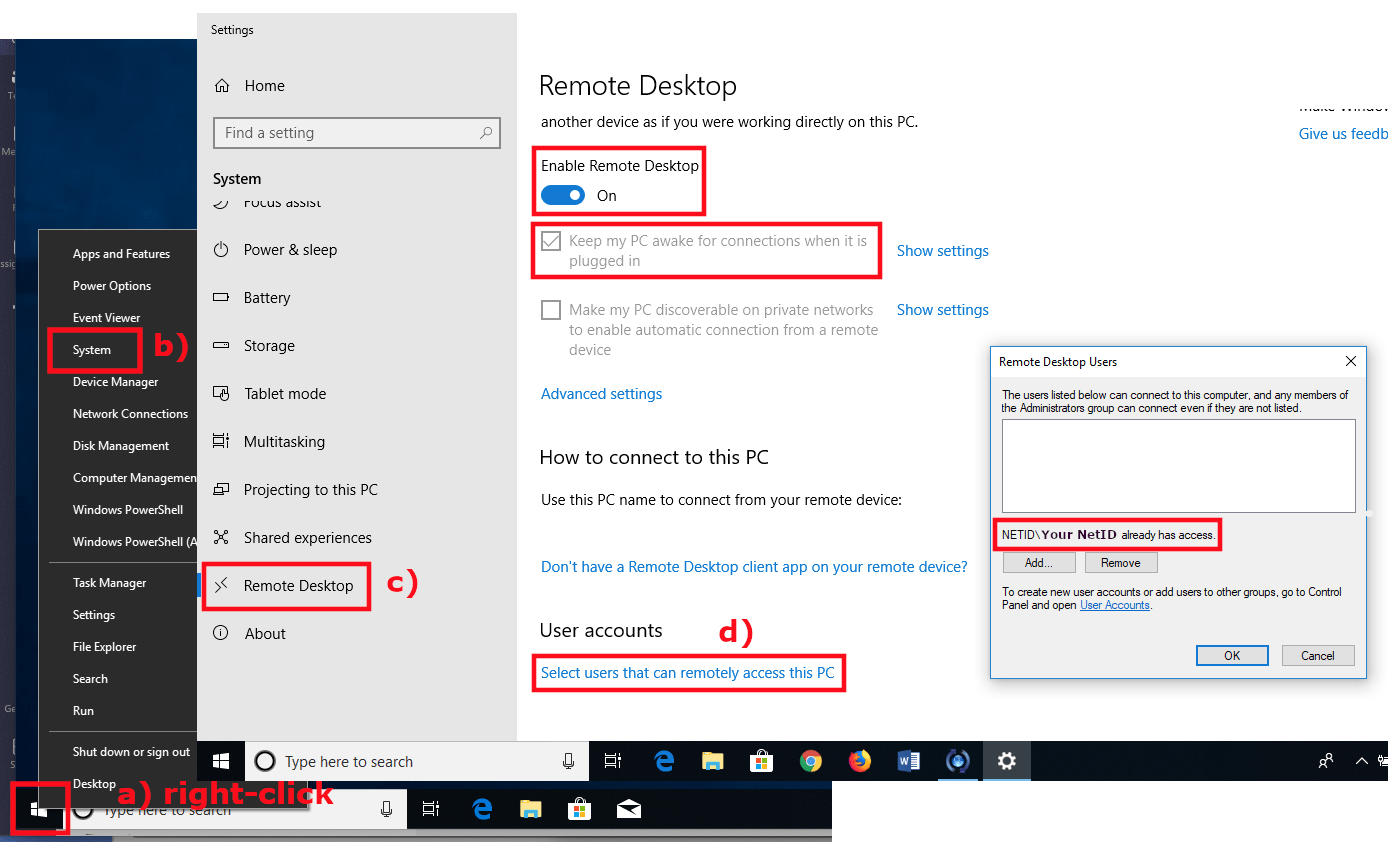
1) Right-click the lower-left Windows icon, click System, click Remote Desktop, click Select users that can remotely access this PC.

2) Confirm the following settings:

Enable Remote Desktop should be On.
Keep my PC awake for connections when it is plugged in should be checked.
In the Remote Desktop Users window, you should see NETID\Your NetID already has access.

Connect to your work computer from a separate computer (follow these steps from your home computer).

connecting from a Windows 10 computer
connecting from a Mac OS X computer


Windows 10

1) Start the application Remote Desktop Connection (already installed on any Windows 10 computer).
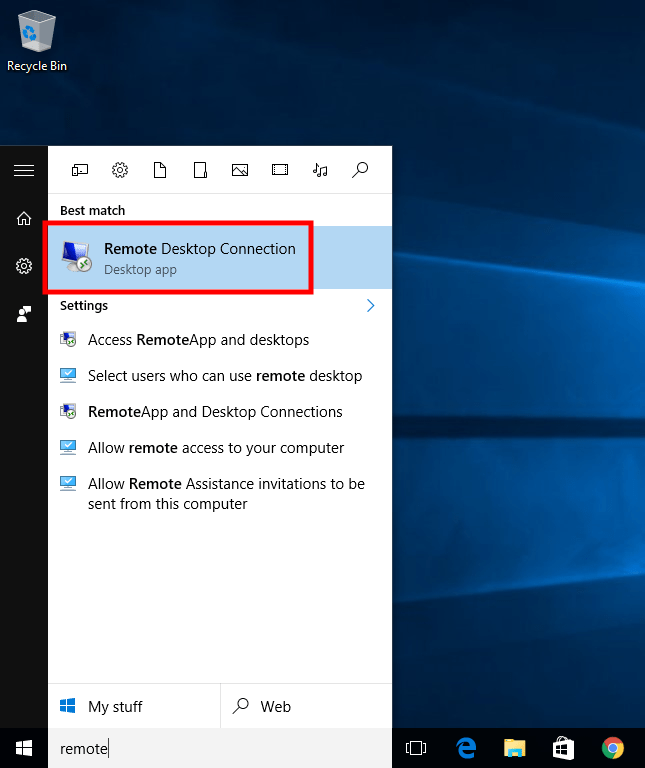
start_remote_desktop_connection

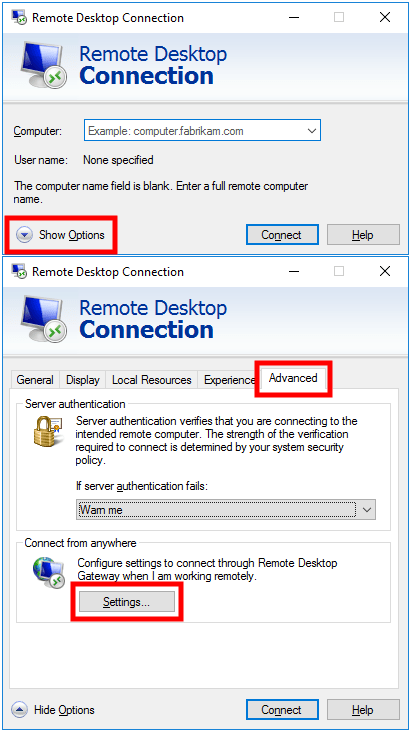
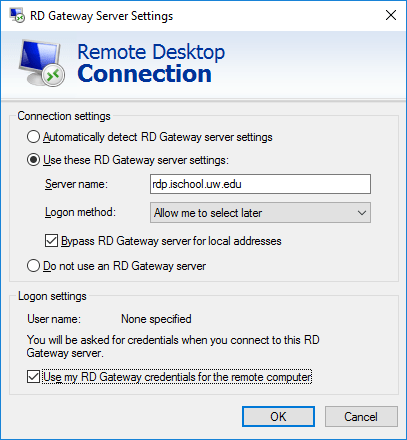
2) Click Show Options, click Advanced, click Settings…
 

3) For Connection settings:

You need to check the RD Gateway server settings.
Server name: rdp.ischool.uw.edu
Logon method: Allow me to select later
You need to check the Bypass RD Gateway server for local addresses.

For Logon settings:

Check Use my RD Gateway credentials for the remote computer

Click OK
 

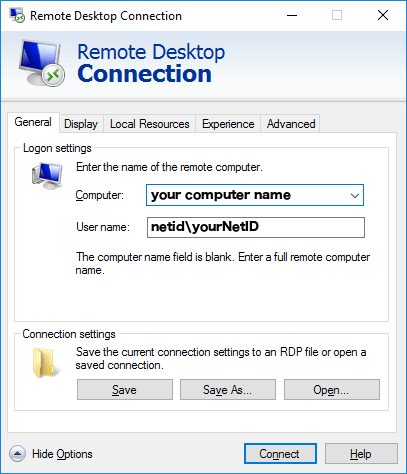
4) Click General

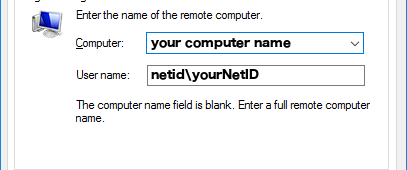
For Computer: use your computer name (usually something like is-yourNetidx220, see this if you need to find your computer name).
For User name: use netid\yourNetID

Click Connect, enter your NetID password when prompted to connect to the network.


Mac OS X

1) Download and install the free Microsoft Remote Desktop application from the Apple Store, you will need an Apple ID to download the application.

microsoft remote desktop

2) Start the Microsoft Remote Desktop application, (settings about improving performance or giving access to your microphone or webcam are up to you; select the settings you prefer), click the gear-looking-icon, click Preferences…, click Gateways.
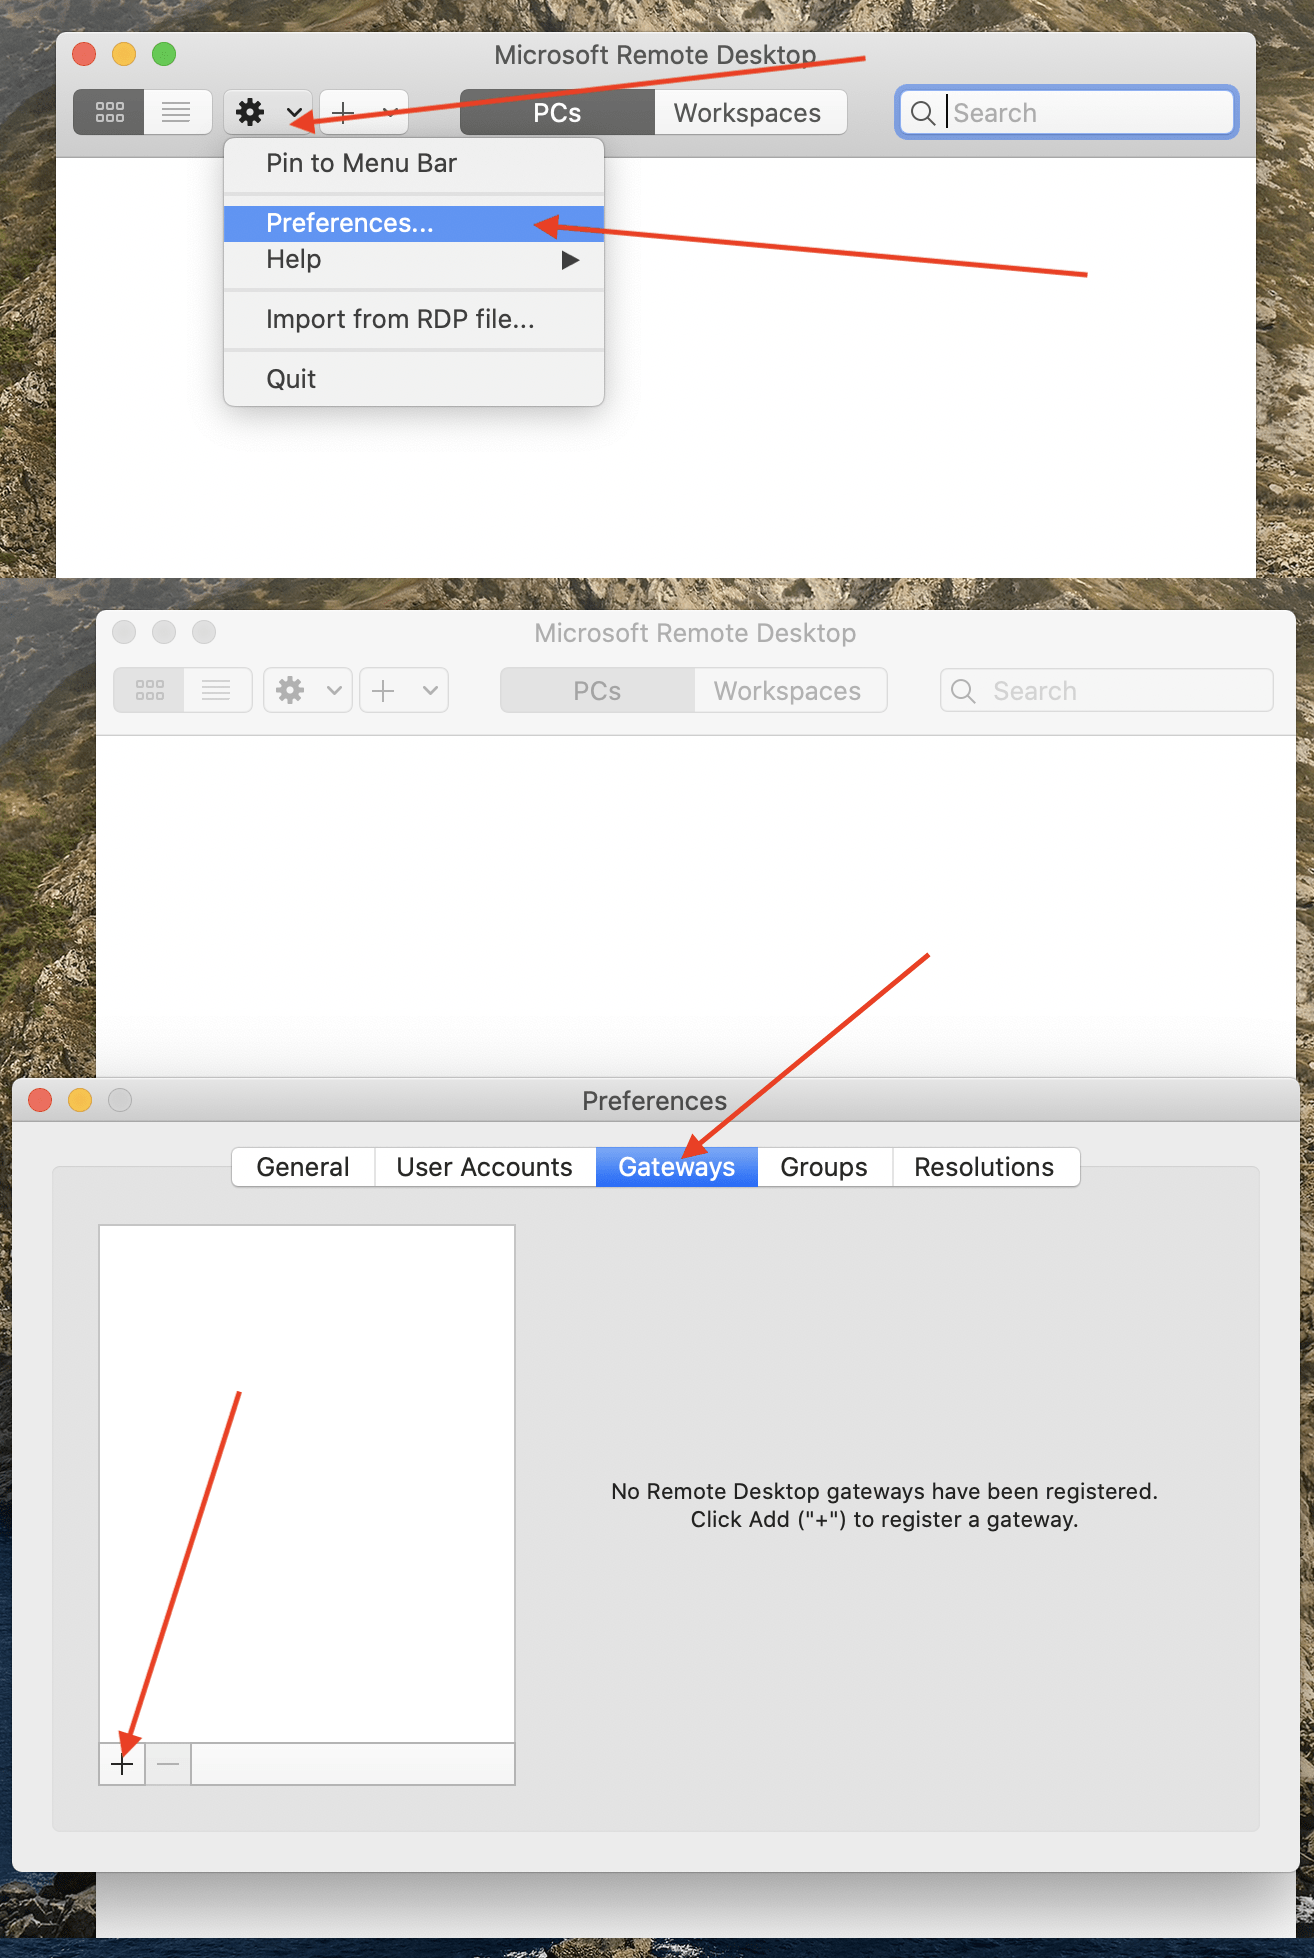
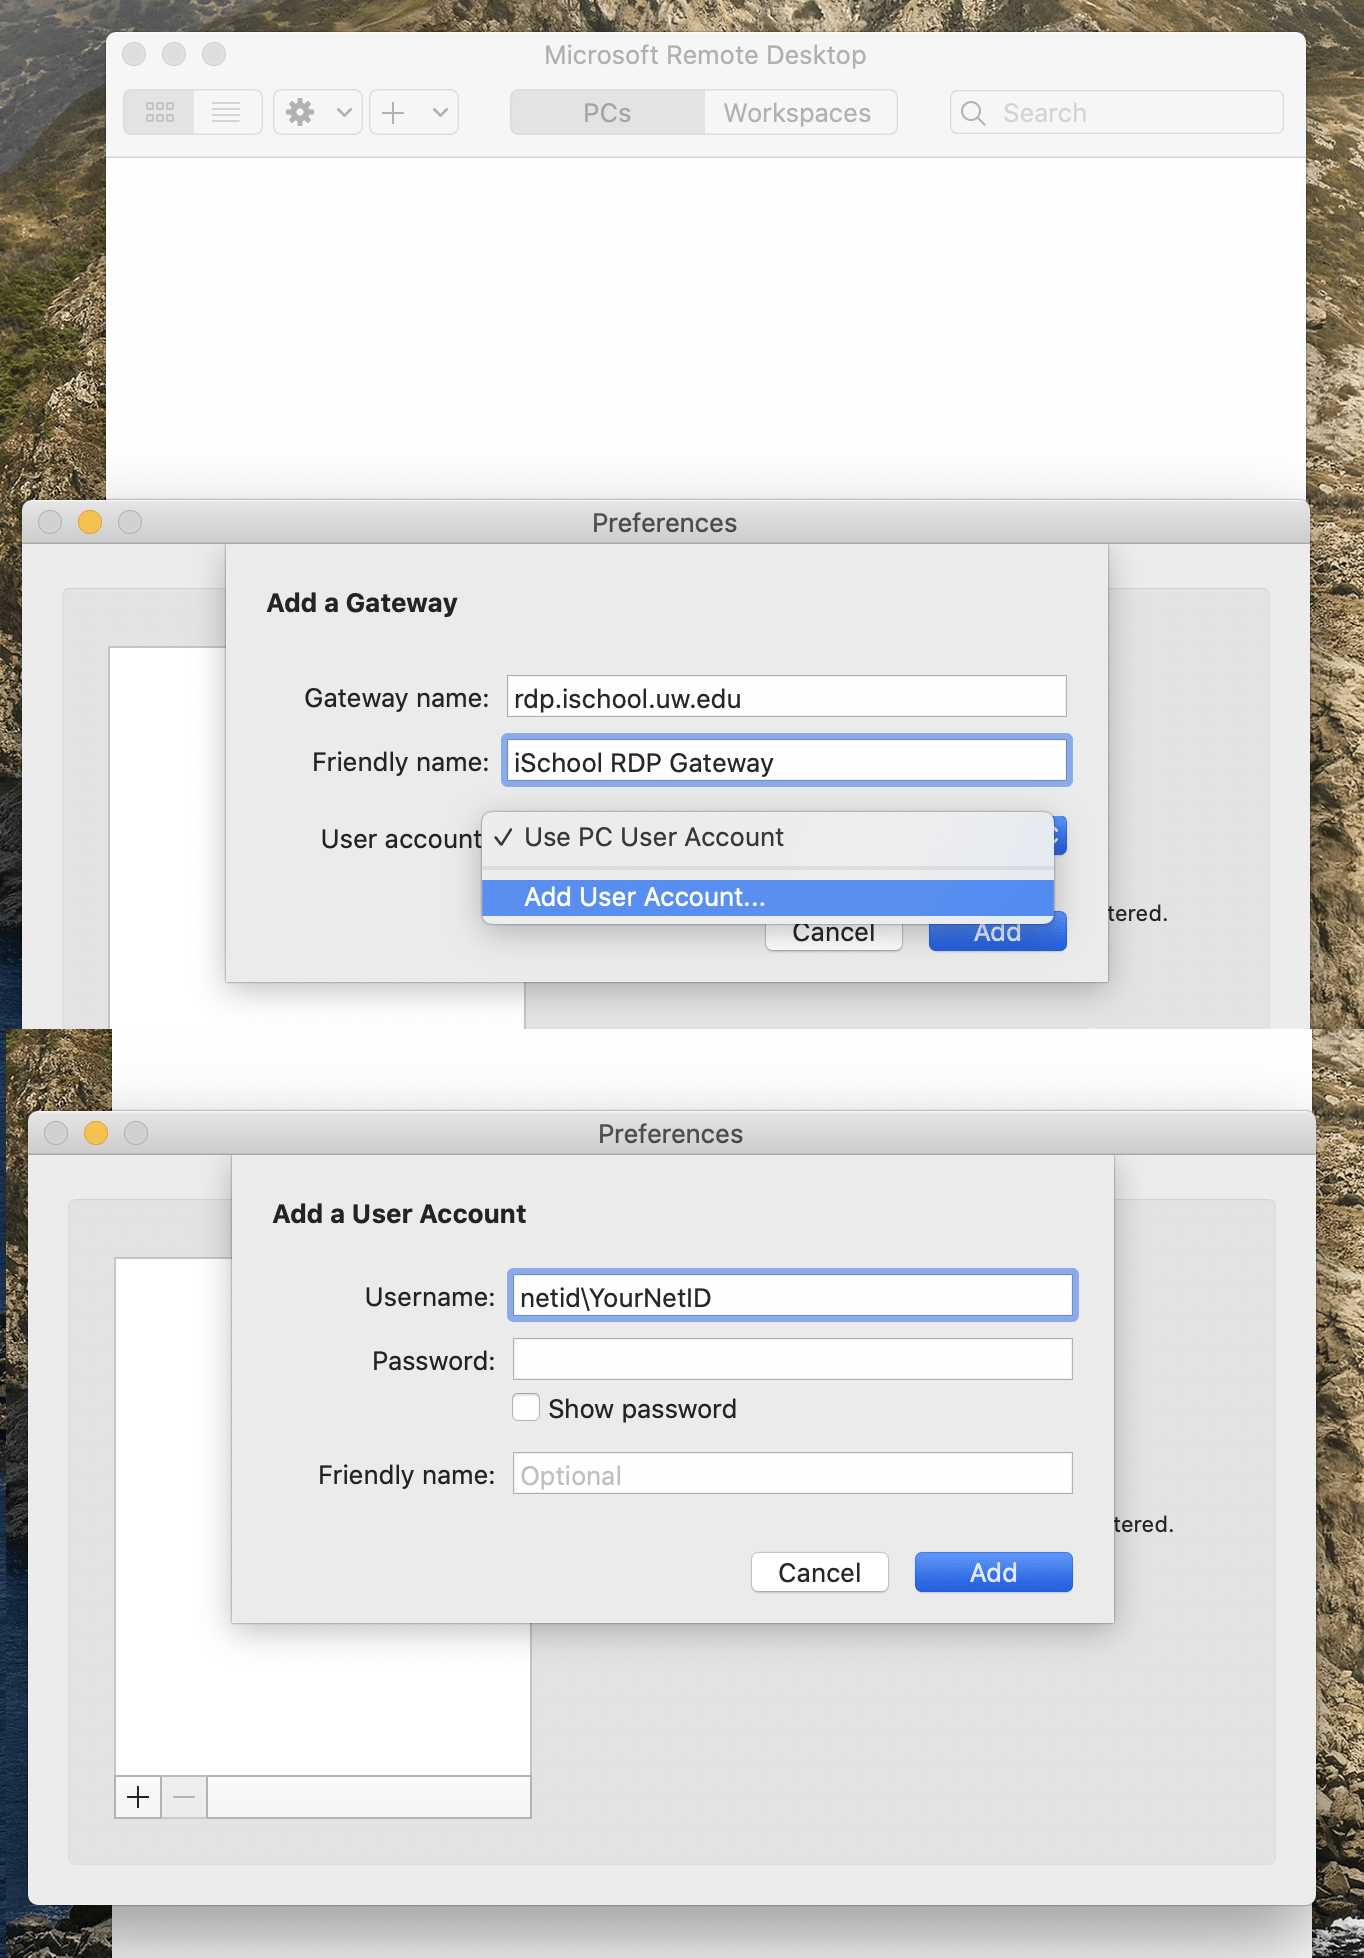
Click the + button in the bottom-left, use the following settings:

Gateway name: rdp.ischool.uw.edu
Friendly name: iSchool RDP Gateway

Click the drop-down next to User account:, click Add User Account…

use the following settings:

User name: netid\YourNetID
Password: YourNetIDPassword

Click Add, click Add
Close the Preferences window

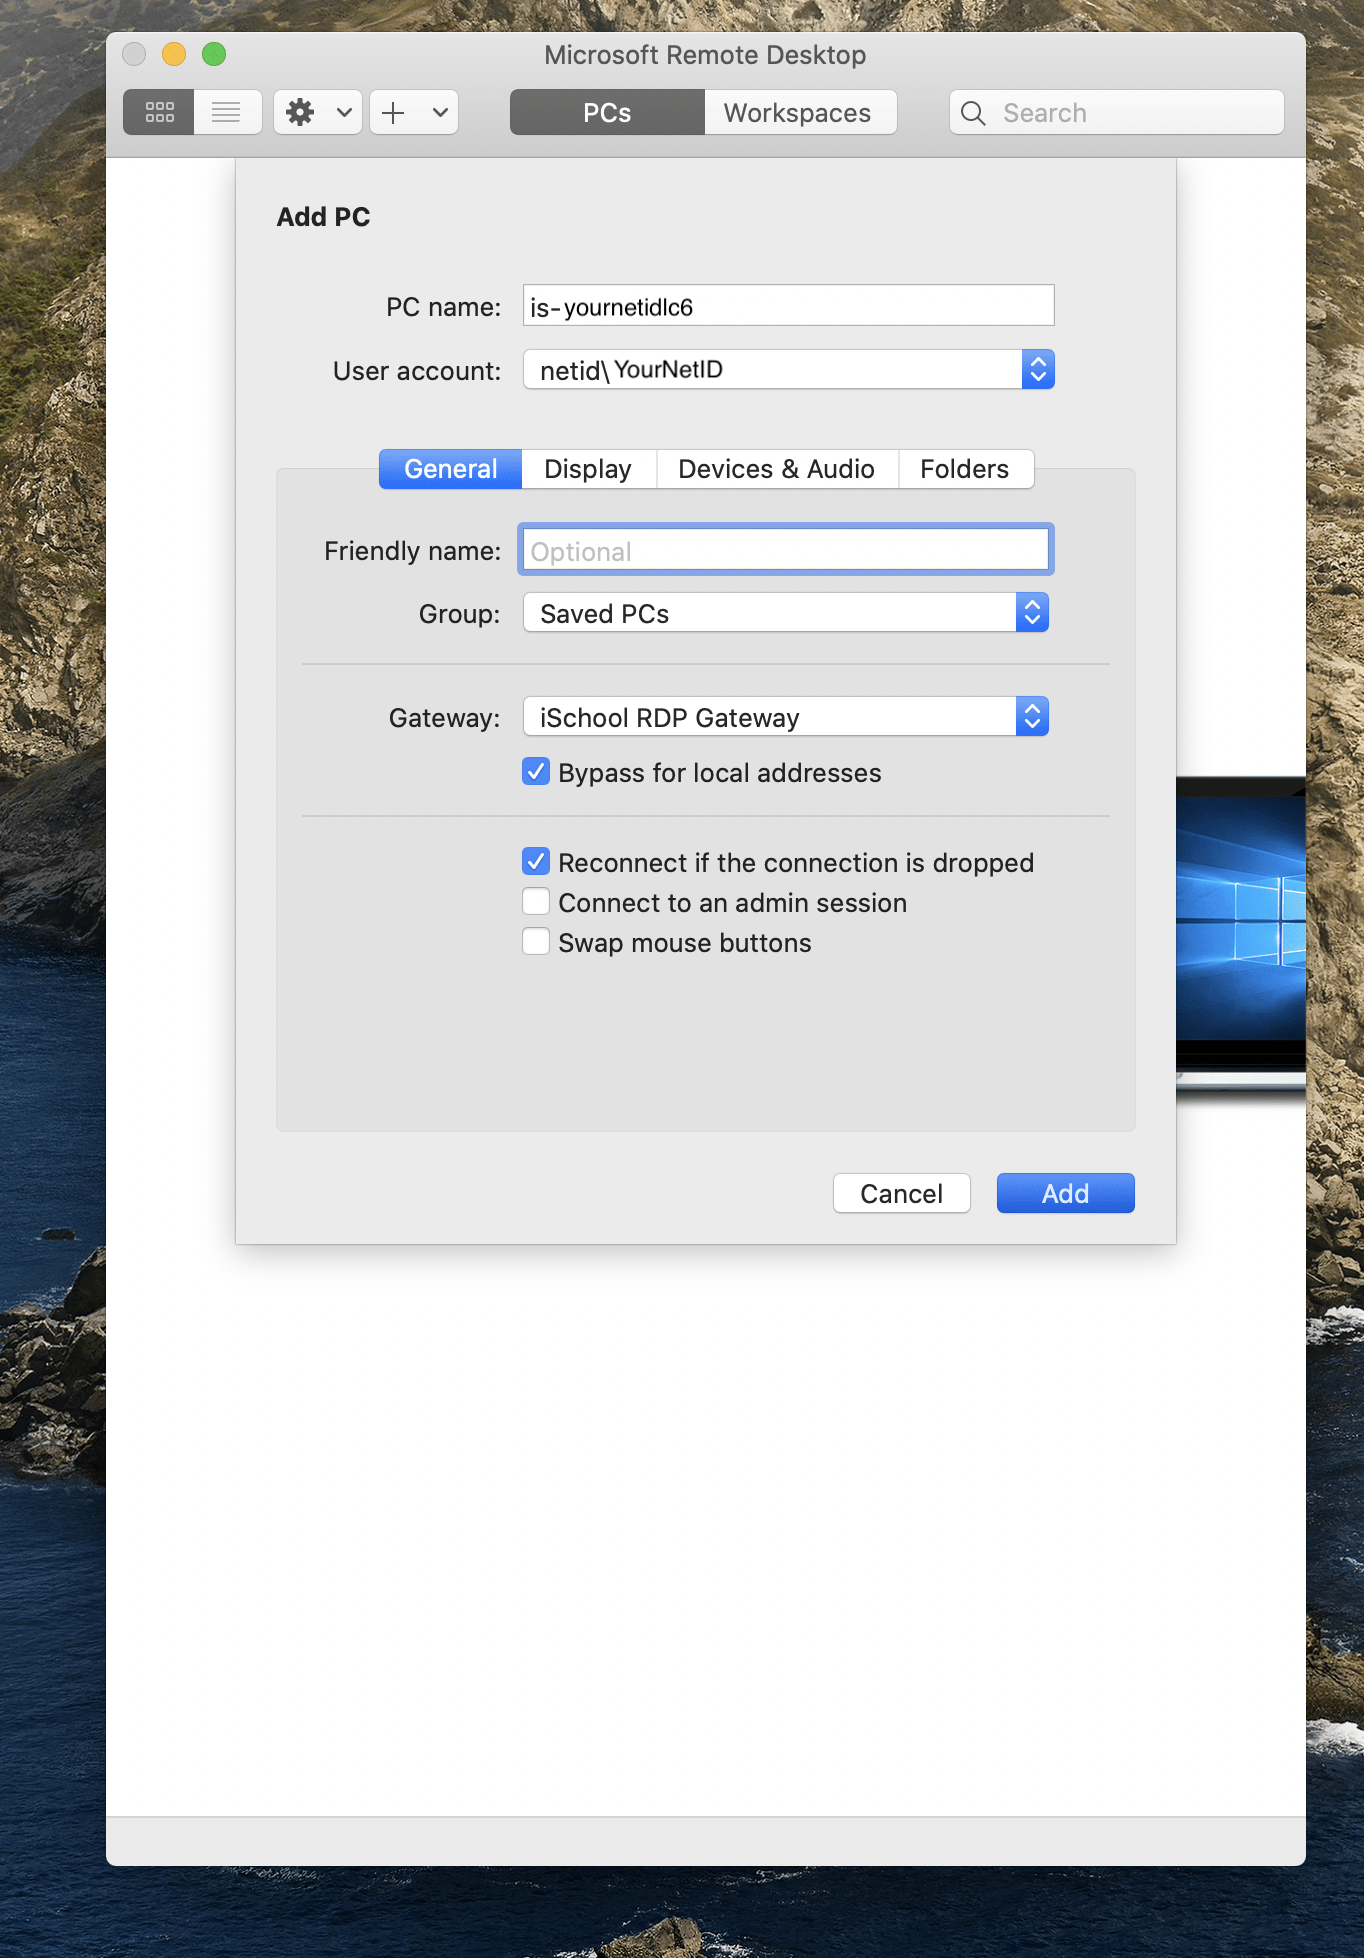
3) In the Microsoft Remote Desktop window click Add PC, use the following settings:

PC name: usually something like: is-YourNetIDlc6 or is-YourNetIDly3 or is-YourNetIDl480

User account: select the user account you created in the previous step (netid\YourNetID)

Gateway: select the iSchool RDP Gateway (or whatever name you created in Step 2)

(Other settings are fine to leave as is. They can be modified later).

Click Add
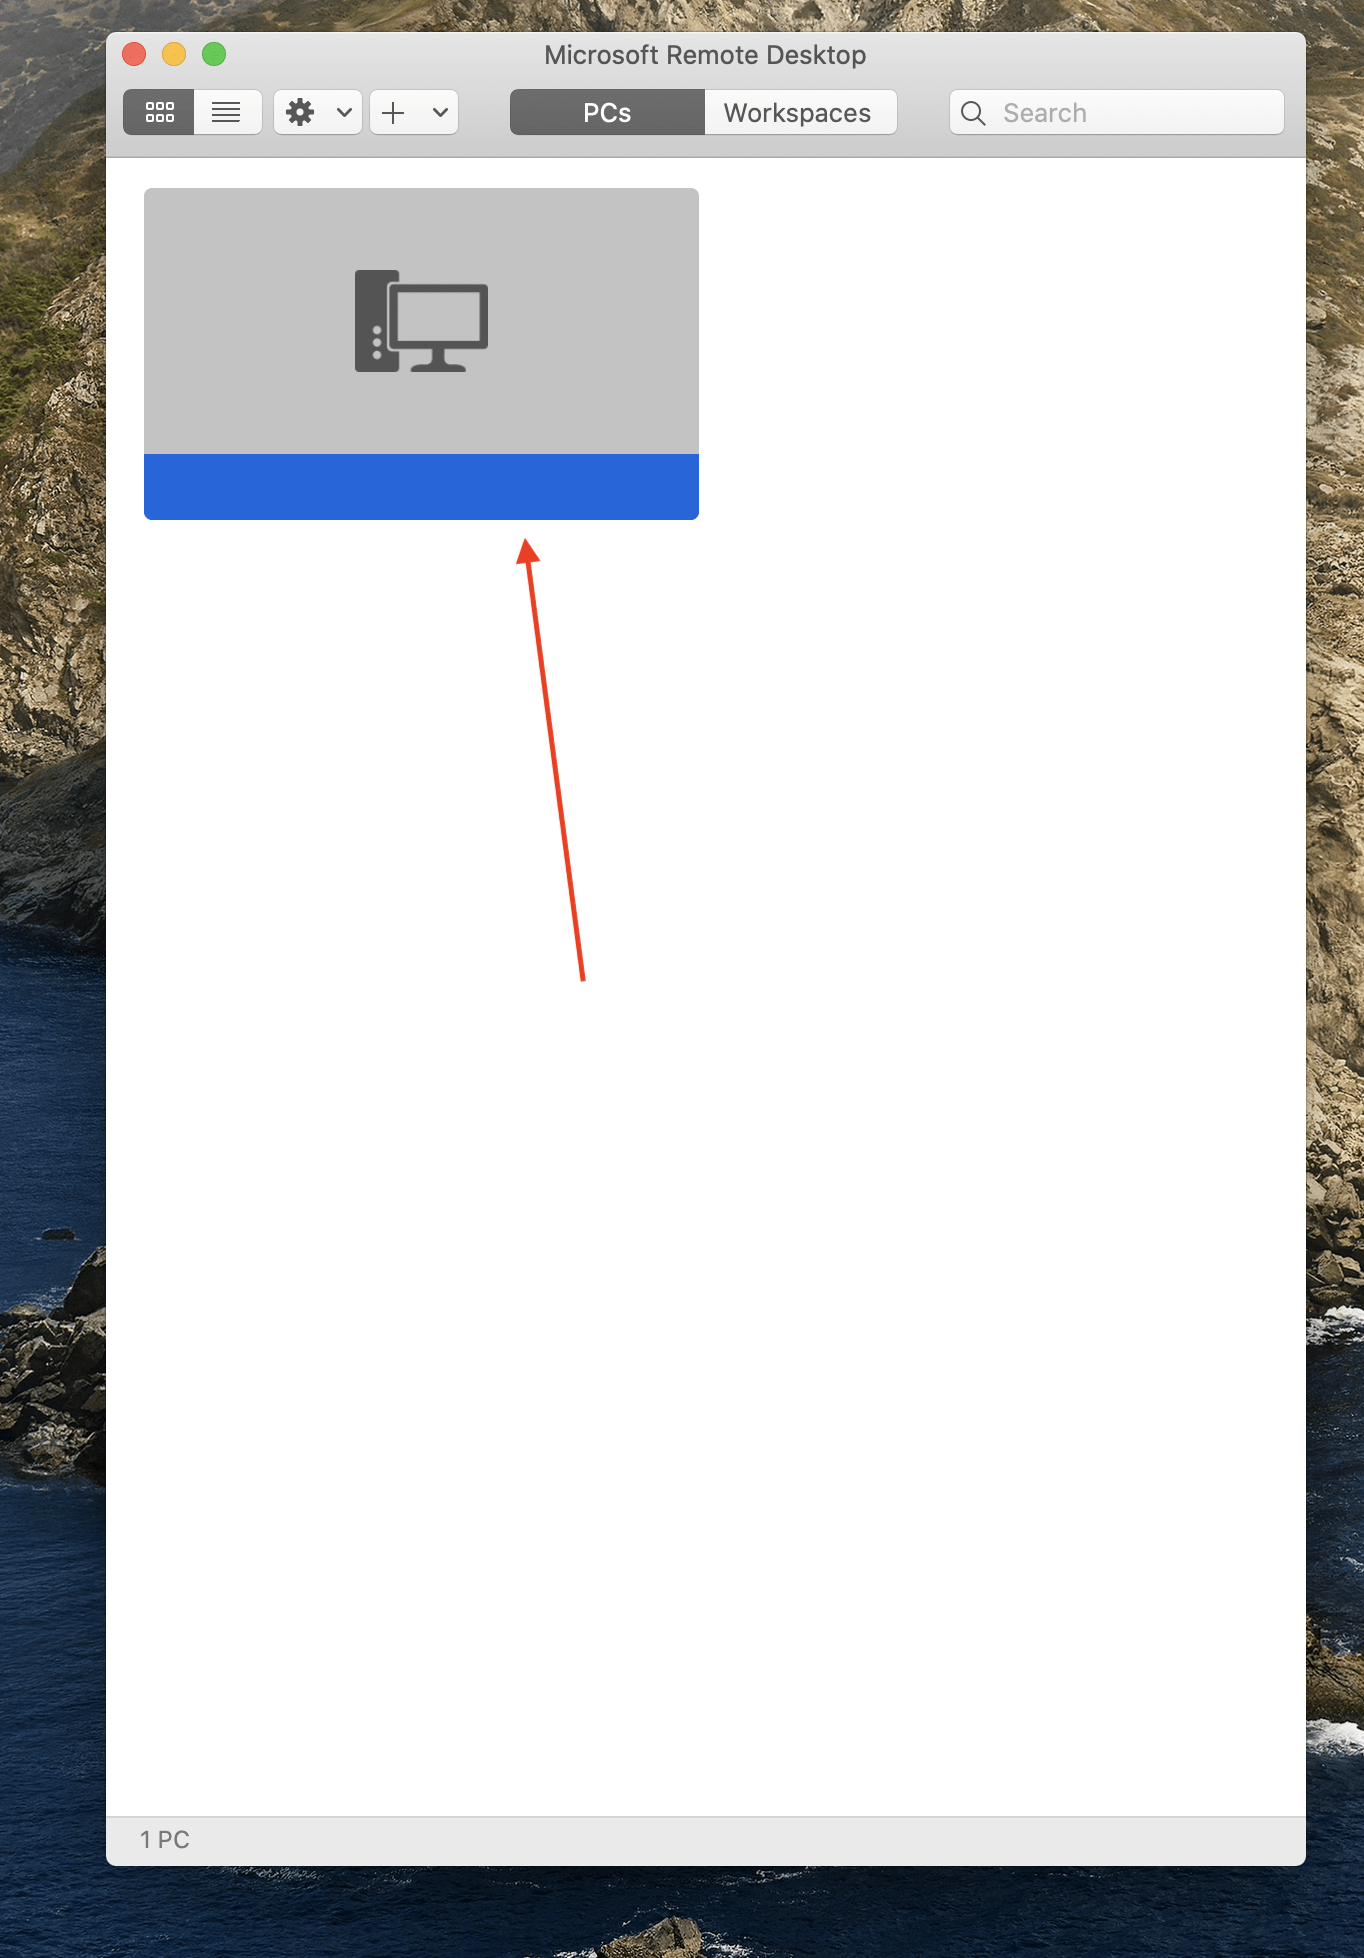
4) Double-click the connection you made in Step 3, if a certificate-verification window appears it is fine to click Continue.
How to run Windows (and software that will only run on Windows) on a Mac

This is a high-level overview of running Windows on a macOS device.  This is not intended as a fully detailed walkthrough. There are fully detailed guides findable via web-searching. If web searching and this article are not enough information, please contact or stop by the iSchool IT Help Desk.

There are two ways to run Windows on a macOS device:

  1. Apple Boot Camp
  2. Virtual Machine (VM) software

Either method requires a full Windows operating system installation file before proceeding. Either method can be done for zero-cost, assuming you already have access to a macOS device. If you are a University of Washington student, you can download a full Windows installation file, compatible with either method, for zero-cost, from the Microsoft Azure for Education website:

Microsoft Azure for Education software downloads

Visit this web page for much more information:

University of Washington information about Microsoft Azure for Education

In general, you will want to download and use the most recent, 64-bit version of Windows Education.

METHOD 1
Apple Boot Camp

The advantage of this method is you get to use all of your CPU and RAM for Windows allowing it to run as fast as possible on your computer.  The disadvantage is that you will have to reboot your computer in order to switch between operating systems.

Apple’s Boot Camp Support website has more information and detailed instructions:

https://www.apple.com/support/bootcamp/

METHOD 2
Virtual Machine

The advantage of this method is you can use Windows in addition to your default macOS environment.

You will need to install one of the software options below.  The software options below, allow you to run a Virtual Machine.

Parallels costs money to obtain. Parallels is relatively easy to use, fully featured, and has detailed online support.  Parallels can be obtained at a discount by faculty, students, and staff, by searching this website: https://onthehub.com/.

Detailed instructions for creating a Parallels Virtual Machine, and installing Windows onto it, can be found by searching the Parallels Knowledge Base:

https://kb.parallels.com/

VirtualBox is zero-cost.  It is also arguably the most complicated to use.

Detailed instructions for creating a VirtualBox Virtual Machine, and installing Windows onto it, can be found by searching the VirtualBox documentation:

https://www.virtualbox.org/wiki/Documentation

UTM is zero-cost.

Detailed instructions for creating a UTM Virtual Machine, and installing Windows onto it, can be found by searching the UTM documentation:

https://docs.getutm.app/

Tips for working with Virtual Machines:

  • Consult the Virtual Machine-software-maker’s documentation.
  • For the best performance, your macOS device should have a Solid State Drive (SSD).
  • Check for updates to your VM software and install them all.
  • There may be some VM settings you need to configure to get Windows to run optimally.  Check the documentation for the software you are using for recommendations.

Basic procedure for saving scan files on a USB Flash Drive for a Ricoh printer

Notes:

  1. This machine only supports FAT16 or FAT32 formatted USB drives.
  2. SD cards must be 2GB or smaller.
  3. Saving might fail if the USB flash memory features password protection or other security features.
  4. Only connect USB flash memory to the USB slot.
  5. Insert the USB drive directly into the media slot.
  6. Do not remove the media while data is being written. Doing so will result in corrupted data.

1. Press the [Home] key on the top left of the control panel, and press the [Scanner] icon on the [Home] screen.

Screen Shot 2013-08-08 at 3.05.07 PM

2. Insert a removable memory device in the media slot. You can connect only one removable memory device at a time. The media slot cannot be used if both an SD card and a USB flash memory are inserted into it at the same time.

3. Make sure that no previous settings remain. If previous settings remain, press the [Reset] key.

4. Place originals.

5. Press [Store File].

6. Press [Store to Memory Device].

7. Press [OK].

8. If necessary, specify the scan settings according to the original to be scanned.

Screen Shot 2013-08-12 at 2.49.54 PM

9. Press the [Start] key. When writing is complete, a confirmation message appears.

10. Press [Exit].

11. Remove the memory device from the media slot

Basic Procedure for Sending Scan Files by Email with Ricoh Printer

Basic Procedure for Sending Scan Files by Email

1. Press the [Home] key on the top left of the control panel, and press the [Scanner] icon on

the [Home] screen.

Screen Shot 2013-08-08 at 3.05.07 PM

2. Make sure that no previous settings remain.

If a previous setting remains, press the [Clear Modes] key.

3. Press the [E-mail] tab.

Screen Shot 2013-08-08 at 3.17.09 PM

4. Place originals.

5. If necessary, specify the scan settings according to the original to be scanned.

Screen Shot 2013-08-08 at 3.17.09 PM

6. Specify the destination. You can specify multiple destinations.

7. To specify the e-mail sender, press [Sender Name].

8. Press [Manual Entry].

9. Enter the e-mail address.

10. Press [OK].

11. Press the [Start] key.


How to edit a page of the School website

How to edit a page of the School website

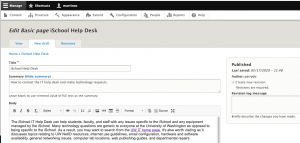
iSchool staff have the ability to edit and update pages on the School website. To edit a page, follow the steps below:

Login
– Go to ischool.uw.edu and click TOOLS > SITE LOGIN
– Log in using your UW NetID and UW password.

Editing Content
– Once you’re logged in, navigate to the page you wish to edit.
– The pages that you have permission to edit will have an “Edit” link in the top, right corner of the page.

This will bring up the editor for the page.

In addition to being able to edit the contents of the page you will see the status of the page you’re about to edit and the “Last saved” date.

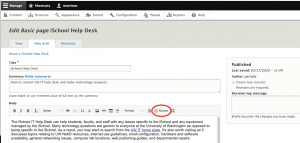
If you feel more comfortable editing the source code of the page, click on the “Source” button in the WYSIWYG (What You See Is What You Get) editor and make your desired changes. You are only permitted to use “Filtered HTML” in your source code, so be careful about the HTML tags you choose.

Saving Changes
– Once you are done editing, click the “Save and Request Review” button in the bottom, left corner of the page.
– Alternatively, you can also select “Save and Create New Draft” to save a draft of your changes if you want to return to this page later to finish up.

Once you request a review, your edit will be reviewed by The Communications Team. You will receive an email when your edits are published.

Guidance for spam and phishing protections

Guidance for spam and phishing protections

UW-IT’s information about how to enable and maintain spam protections for UW Office 365 Exchange Online email accounts is on this web page:

https://itconnect.uw.edu/connect/productivity-platforms/microsoft-productivity-platform/exchange-online/email-protection-enhancements/early-adopter-access/#how_to

iSchool IT recommends following the steps in the “Enable” and “Maintain” sections of the web page linked above.

Even after configuring settings as recommended on the web page linked above, it is still possible for spam and phishing emails to make it to your inbox. When you do receive suspicious emails, follow the guidance in the “What you can do” section of this web page:

https://itconnect.uw.edu/connect/email/resources/protecting-your-email/

How to use VoiceThread for presentations

VoiceThread is a web-based presentation tool that offers both free and fee-based services.

A VoiceThread is “a collaborative, multimedia slide show that holds images, documents, and videos and allows people to navigate pages and leave comments in 5 ways – using voice (with a mic or telephone), text, audio file, or video (via a webcam).”

To learn how to upload, comment (record), and share your presentation using VoiceThread, view our complete VoiceThread guide on the iSchool Online Learning Support site, or follow the tutorials on the VoiceThread website.