How to Export (to PST) or Import (from PST) a folder in Outlook

This article is designed specifically to assist people who are involved in a Records Request but is helpful for anyone who wants to save or transfer any amount of Outlook email (or any other Outlook folders).

If a Records Request asks for email, it must be saved as a PST (Personal Storage) file. We recommend that you create a unique Folder for the Records Request and then copy (not move) all the messages that were requested to this Folder. Then you can export just this Folder to a PST.

NOTE

  • Prior to starting this process, we recommend that you use the search feature in Outlook to narrow/refine the results as much as possible. Here are instructions for searching in Outlook.

https://support.microsoft.com/en-us/office/how-to-search-in-outlook-d824d1e9-a255-4c8a-8553-276fb895a8da

  • This process can only be done on Windows. If you are using Outlook on a Mac, please export your email to an OLM file following these instructions and then contact iSchool IT so we can convert the OLM file to a PST file.

https://support.microsoft.com/en-us/office/export-items-to-an-archive-file-in-outlook-for-mac-281a62bf-cc42-46b1-9ad5-6bda80ca3106

To export (archive) a folder using Outlook on Windows do the following:

  1. Open Outlook.
  2. Click File -> Open & Export.
  3. Choose Import/Export, select Export to a file and click Next.
  4. Select Outlook Data File (.pst) and click Next.
  5. Select the folder you created for this Records Request and check the Include subfolders box and click Next.
  6. Decide where to save the exported file using the Browse button if that makes it easier to find or just accept the default location and click Finish.
  7. We usually do not recommend adding a password to the data file. You can just leave the password fields blank and click OK.

If you saved the data file to the default location it is here:

\Documents\Outlook Files\backup.pst

To import a data file using Outlook on Windows do the following:

  1. Save the Data File to your computer.
  2. Open Outlook.
  3. Click File -> Open & Export.
  4. Click Import/Export, select Import from another program or file, and click Next.
  5. Select Outlook Data File (.pst) and click Next.
  6. Click the Browse button to select the data file and click Next.
  7. Make sure the Include subfolders box is checked, select Import items into the same folder in and click Finish.

You should now see this data file connected to Outlook in the left-hand pane of Outlook.

Mailbox best practices when using Microsoft Outlook – how to keep your Mailbox small

Microsoft Outlook stores data (E-mail, Calendar items, Contacts, etc.) in a file. If you use Outlook at home and like many users are not connected to an Exchange server, the file is called a PST (Personal Storage) file and is stored on your computer. If you are employed as a faculty or staff member at the iSchool or another business and connect to an Exchange server, the file is called an OST (Offline Storage) file. It contains copies of all the data, which is subsequently stored on the server.

Regardless of what type of file you have, the size of this file is limited if you want good performance and reliability. Although the absolute maximum size of OST files keeps growing (at the UW the limit is currently 100GB), for optimal performance we recommend you keep your OST file much smaller, less than 10GB is ideal.

These instructions will explain some best practices so that your mail store (read: Mailbox size) never grows too much and shows you how to determine the size of your mail store.

NOTE – this process can take anywhere from 30 minutes to 2 hours to complete (depending on the size of your Mailbox), so please allow enough time.

General Best Practices

  • Regularly empty your Junk E-Mail and Deleted Items folders.
  • Don’t save attachments in Outlook. Instead, save the files to your cloud storage, your computer (or some other media), and then delete the message. At the iSchool your computer is backed up so all the files saved locally will be safe.
  • Do not send messages to yourself.
  • Do not send large (read: bigger than a couple of MB) attachments via email, instead put the file in the cloud and send a link to the location so the recipient can view or download it.
  • If you do forward a message with a large attachment, delete the item from your Sent Items. There is no need to keep the file in your Inbox and your Sent Items folder.

Outlook Microsoft 365

1) Check to see how big your mail store is.

– In the left pane of Outlook, right-click your account and select Data File Properties.

– Under the General tab click Folder Size.

2) Sort mail by size.

– In the left pane of Outlook expand Search Folders.

– Click on Large Mail to activate it. By default, your large mail items will be sorted by size with the largest on top. Since large items always contain attachments now you can easily save the files and delete the messages.

3) Using the Mailbox Cleanup tool.

– Click the File menu > Tools > Mailbox Cleanup

– We recommend all the options in the Mailbox Cleanup tool except AutoArchive. We do not ever recommend archiving your email and instead always recommend keeping all of it in your Exchange Mailbox.

– The Cleanup tool can remove redundant messages in any folder or any conversation. Cleaning up redundant items in conversations is a great way to free up space. Here is a video demo of the Cleanup tool, the “Clean Up Conversation” feature is mentioned at 5:12:

Outlook on the web

1) Check to see how big your mail store is.

– Click the gear icon (Settings) > View all Outlook settings > General > Storage

2) Clean up your Mailbox.

– While in Storage, empty your Deleted Items folder.

3) Apply Retention Policies.

– Right click every top level/parent folder and select Assign policy. We recommend choosing 6 Month or 1 Year.

How to schedule/reserve a room in Classic Outlook

How to schedule/reserve a room in Classic Outlook

Schedule/Reserve a Room in Classic Outlook

Note: These instructions are deprecated and for Classic Outlook on Windows and MacOS. If you are using New Outlook please refer to this document instead: How to Find and Book an Available Meeting Room


iSchool faculty, staff, and PhD students have access to several physical rooms, for meeting purposes. Some rooms have Exchange Mailboxes and Calendars. These rooms can be scheduled/reserved directly via an Outlook Meeting Request, similar to scheduling a meeting with a person. A list of rooms and information about the rooms can be found on this webpage: https://uwnetid.sharepoint.com/sites/ischoolnew/sites/ServicesSupport/DropInSpacesReservations . Detailed instructions for scheduling rooms via Outlook/Exchange are below.


Outlook for Windows

Outlook for macOS

Outlook on the Web

Outlook for Windows

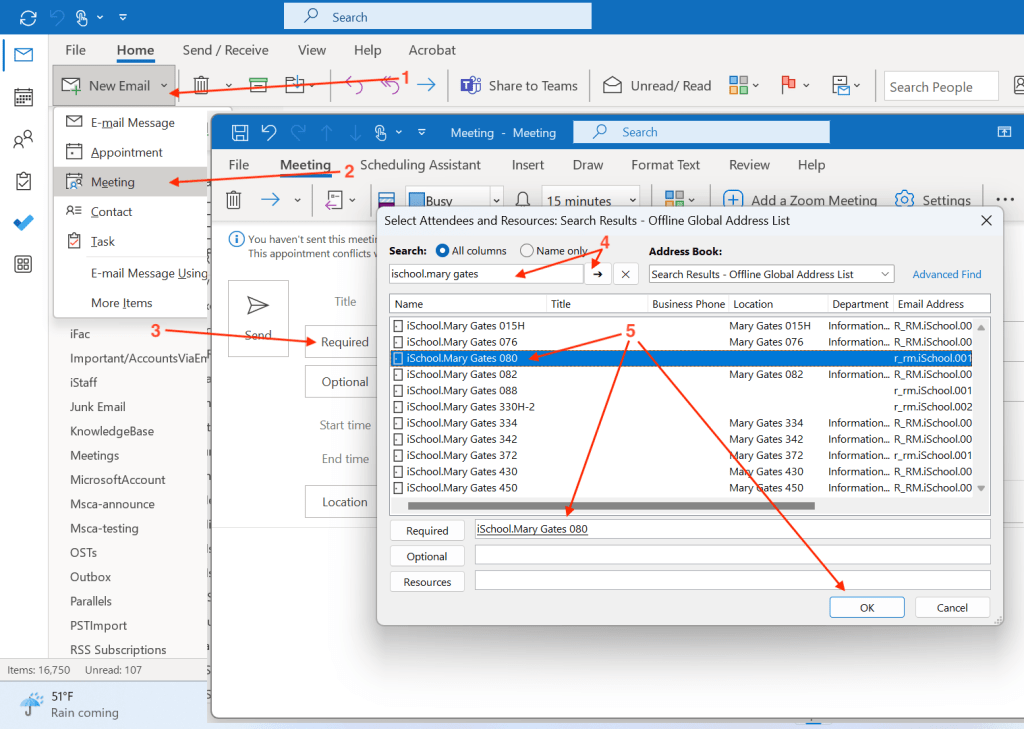
1) Click the arrow button next to New Email , click Meeting. (“1” in the screenshot below).

2) Click Meeting (“2” in the screenshot below).

3) Click Required (“3” in the screenshot below).

4) Search for the room you want to reserve/schedule. The most accurate way to search for a room is by using either the email address or the “display name” from the list above. (“4″ in the screenshot below).

5) Add the room you wish to schedule/reserve to ” Required “; double-click the room from the list or click “Required.” Click OK (“5” in the screenshot below).

6) Click Scheduling Assistant to see when the room is available, add other attendees’ NetIDs as necessary, and adjust meeting times.

7) Click Appointment , add meeting information as necessary, click Send. All attendees will receive the meeting request including the room itself. The request for the room will be accepted or rejected based on room availability.

Outlook for macOS

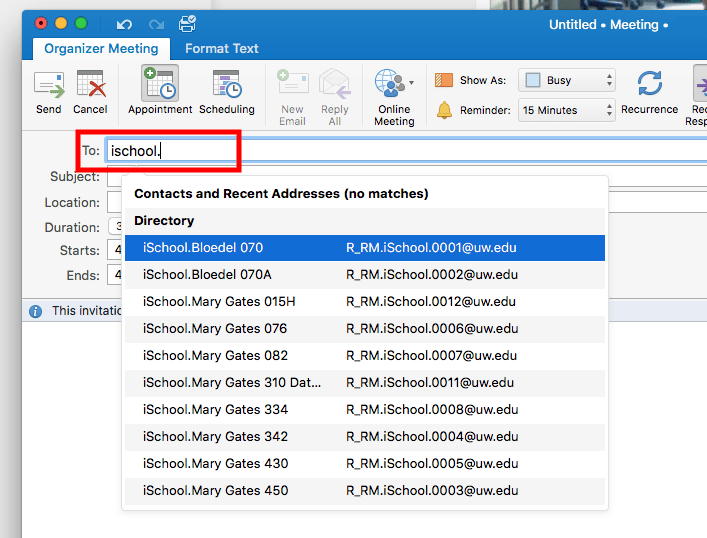
01) Click New Items, click Meeting.

02) In the “To:” field, the most accurate way to search for a room is using either the email address or the “display name” from the list above. Then, select the desired room.

3) Click Scheduling to see when the room is available and adjust meeting times.

4) Click Appointment , add other attendees’ NetIDs in the To: field as necessary, click Send.

All attendees will receive the meeting request including the room itself. The request for the room will be accepted or rejected based on room availability.


Outlook for the Web

1) Sign into the Outlook Web App , use your @uw.edu email address and UW NetID credentials when prompted.

2) Click the Calendar icon in the bottom-left corner.

3) Click New event.

4) In the Invite attendees field, add desired room using email address from the list above. Add other @uw.edu email addresses as necessary. Use the Scheduling Assistant to confirm all attendees, including the room itself, are available. Click Send once all other meeting details are finalized.

All attendees will receive the meeting request including the room itself. The request for the room will be accepted or rejected based on room availability.

How do I add iSchool printers to my personal computer?

How do I add iSchool printers to my personal computer?

Adding an iSchool Printer to a Personal Computer:

Instructions for Windows

Instructions for macOS

Instructions for Windows

1. Find the following information about the printer you would like to use: a) IP address – IP addresses should be labeled in plain sight on each printer b) Make and model – printer should indicate make and model in plain sight If you are unable to determine a printer’s IP address or make or model, contact the iSchool IT Help Desk.

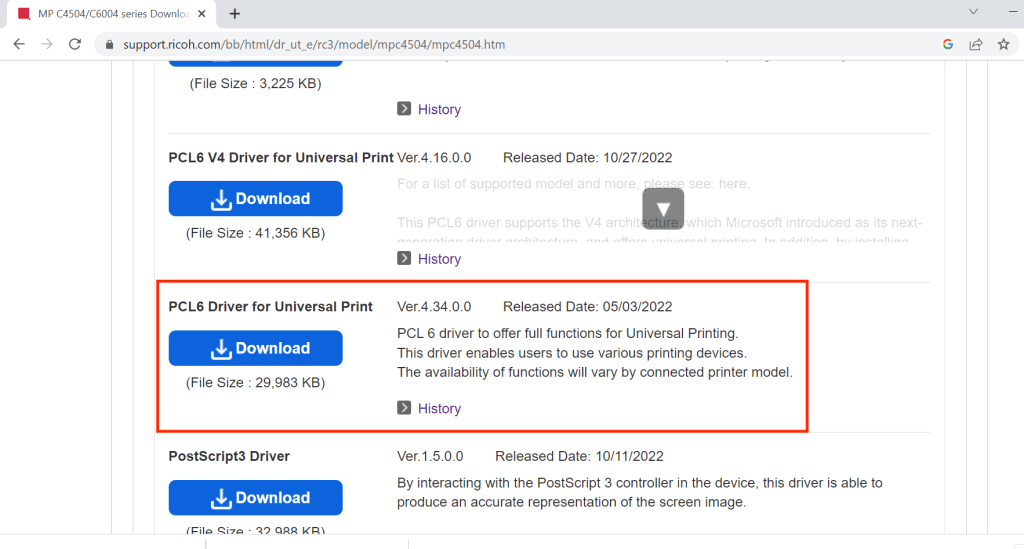
2. Download and install the latest printer driver for the make and model printer you identified in step 1. In general, you will be looking download a Ricoh printer driver: https://www.ricoh-usa.com/en/support-and-download named “PCL6 Driver for Universal Print”:

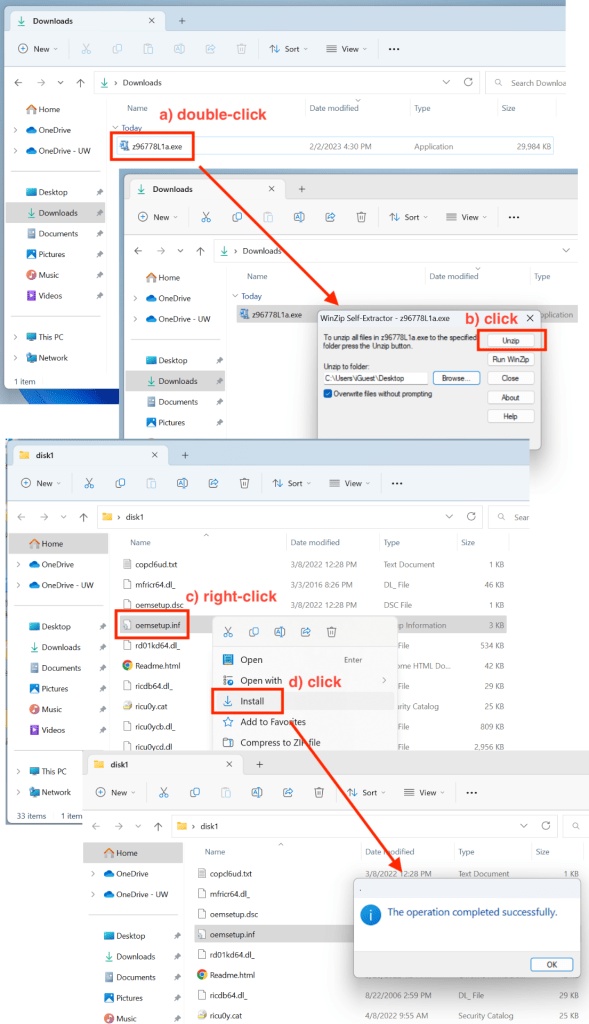
Save the file to your computer. Double-click the file (a)), click Unzip (b)), find then right-click the file named oemsetup.inf (c)), click Install (d)), click Yes. You should receive a “The operation completed successfully” message.

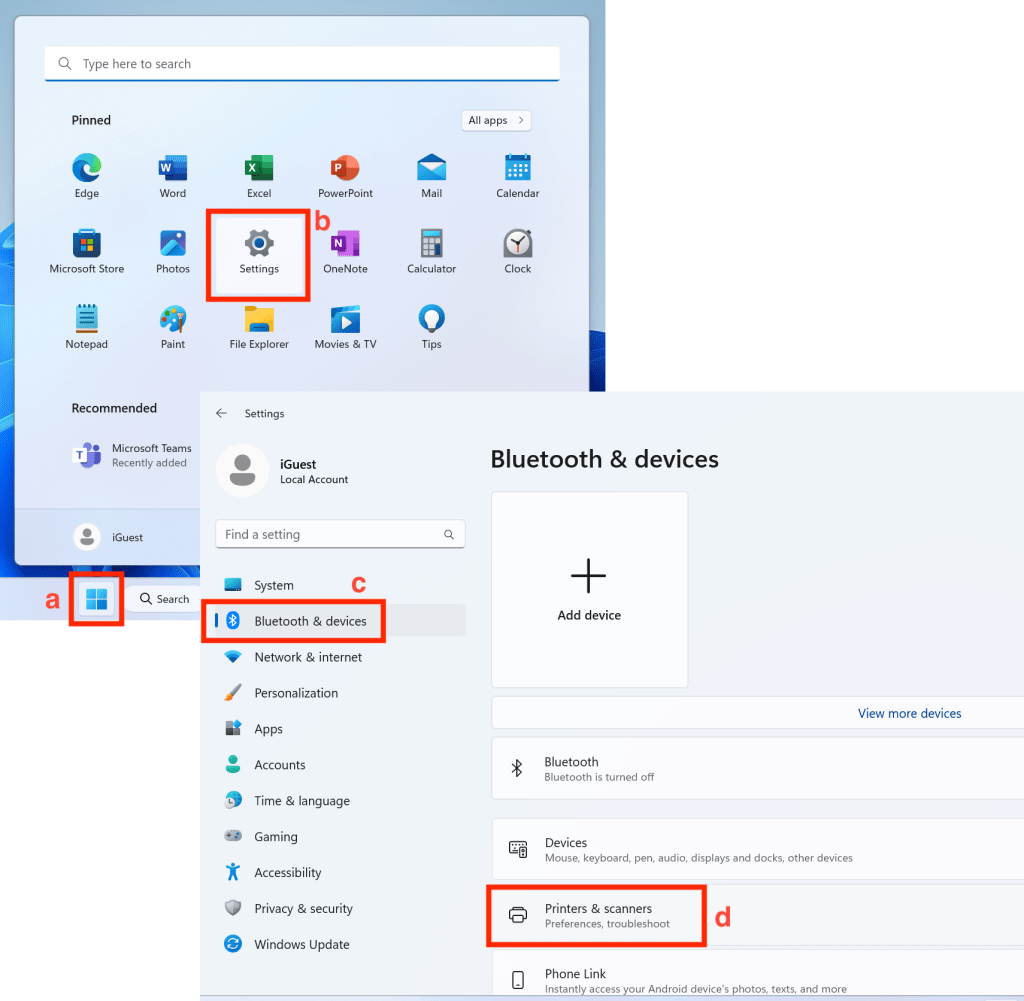
3. Click the Windows icon (a). Click Settings (b). Click Bluetooth & devices (c). Click Printers & scanners (d).

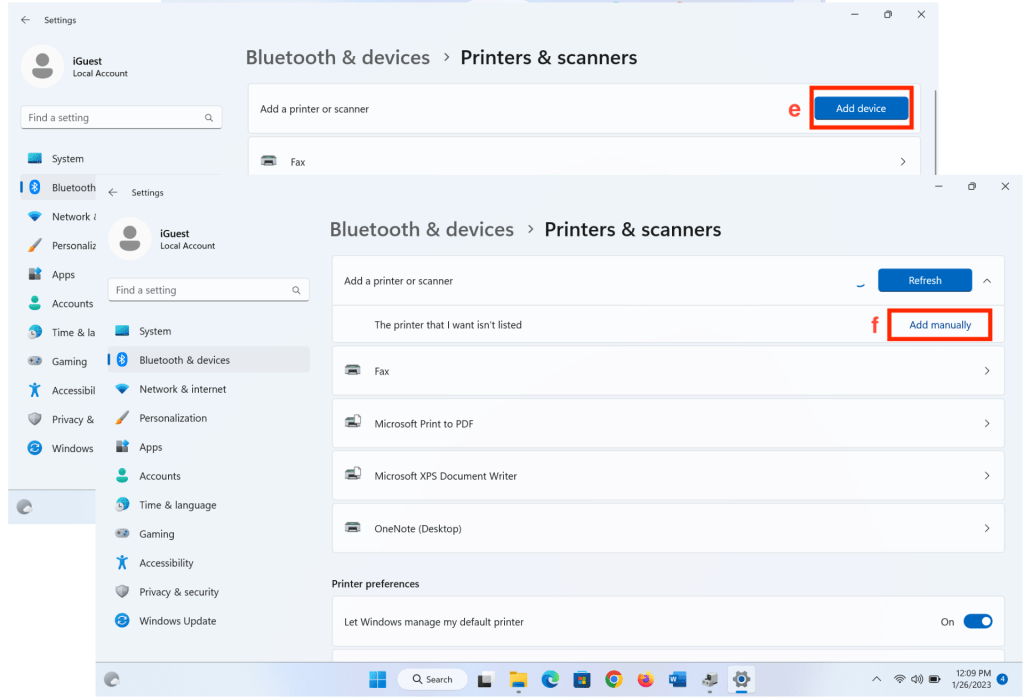
Click Add device (e). The computer will look for available printers. After a few seconds, it will likely fail to find any printers. Click the button that appears: Add manually (f).

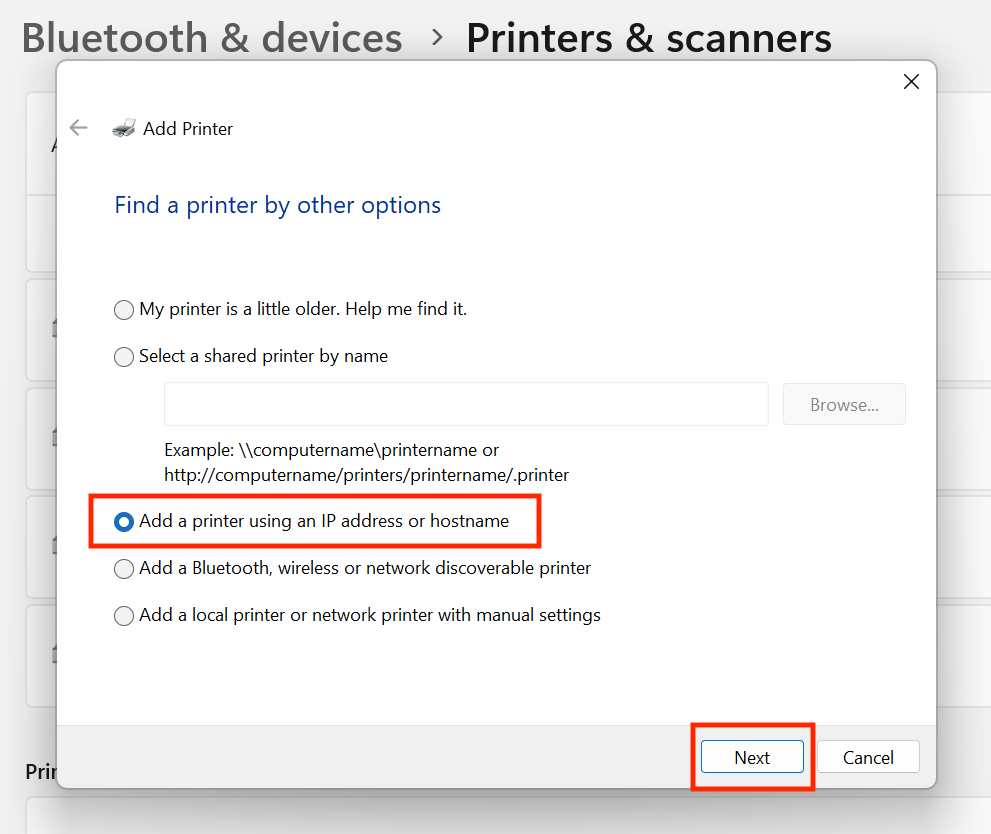
4. Select Add a printer using an IP address or hostname option. Click Next.

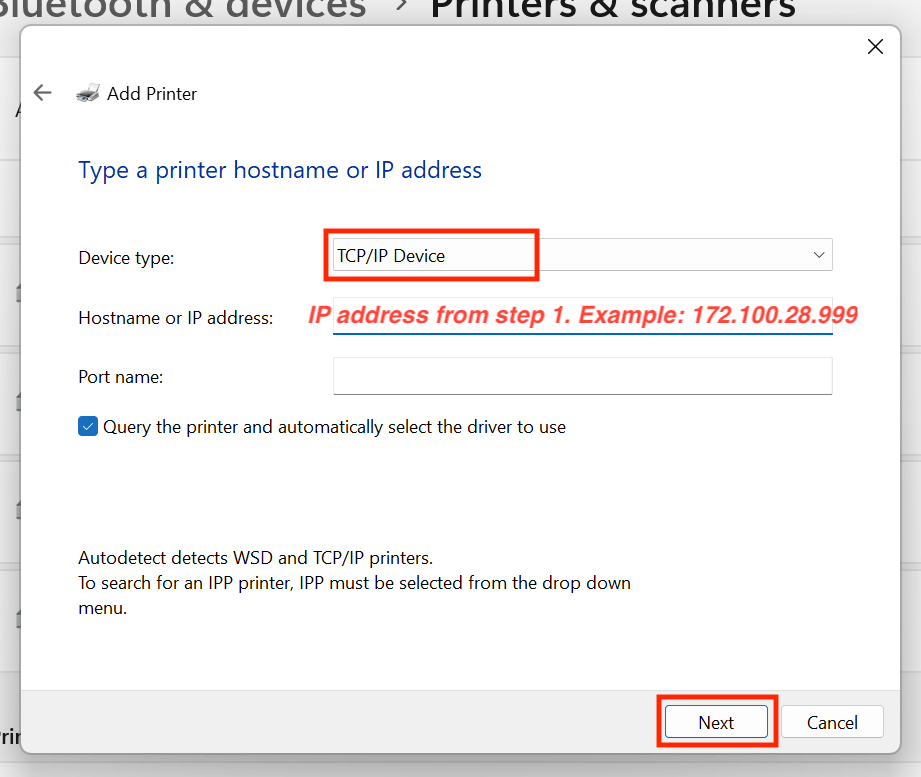
5. Change the Device type: to TCP/IP Device. Type in the IP address you found in step 1 into the Hostname or IP address field. Click Next.

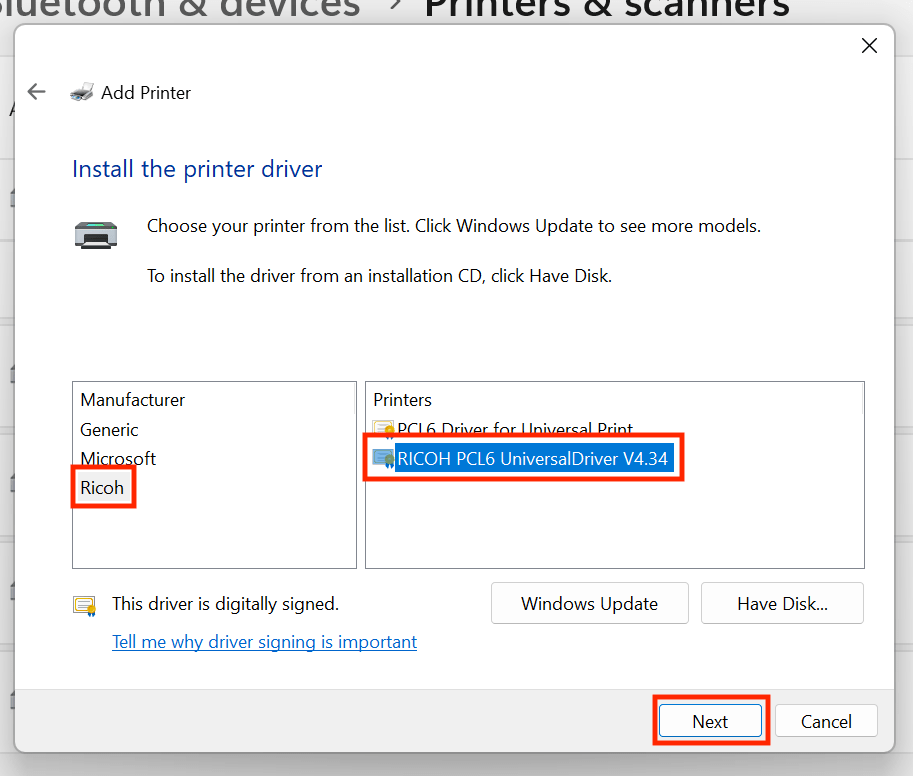
6. Select the “RICOH PCL6 UniversalDriver” printer driver. Click Next.

7. Type in a name for the printer. Click Next.

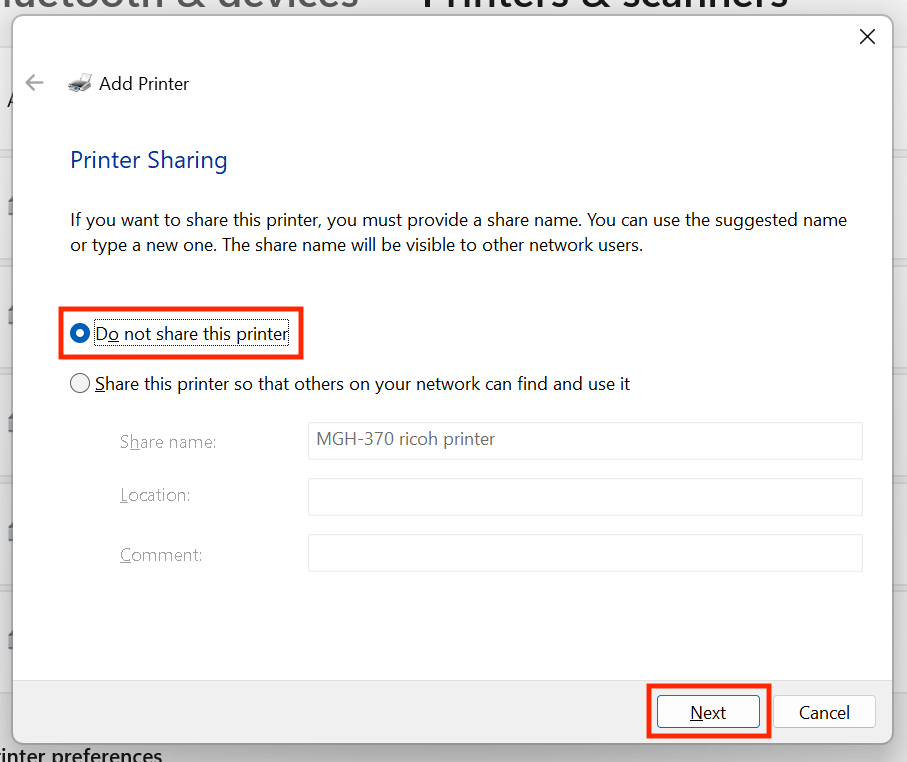
8. Select the Do not share this printer option. Click Next.

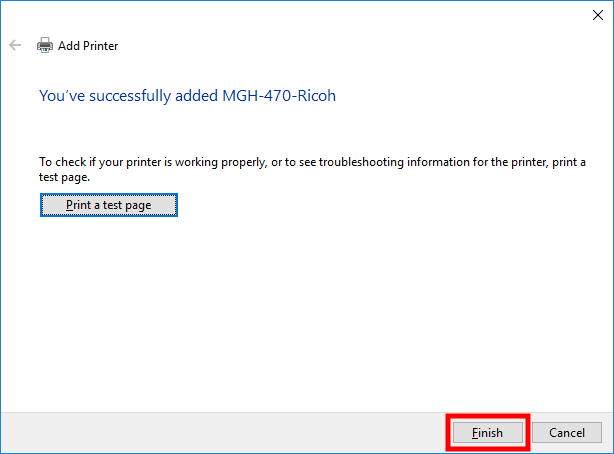
9. You should receive a “success” message. Click Finish. You should be able to print to the printer you just added.


Instructions for macOS

1. Find the IP address and the make and model of the printer you would like to use. IP addresses should be labeled in plain sight on each printer. If you are unable to determine a printer’s IP address or make or model, contact the iSchool IT Help Desk.

2. Download and install the latest printer driver for the make and model printer you identified in step 1. In general, you will be looking for a Ricoh printer driver: https://www.ricoh-usa.com/en/support-and-download If you are printing to a different make or model printer, you will need to web-search for the correct printer driver to install on your computer. If you need help with this step, contact the iSchool IT Help Desk.

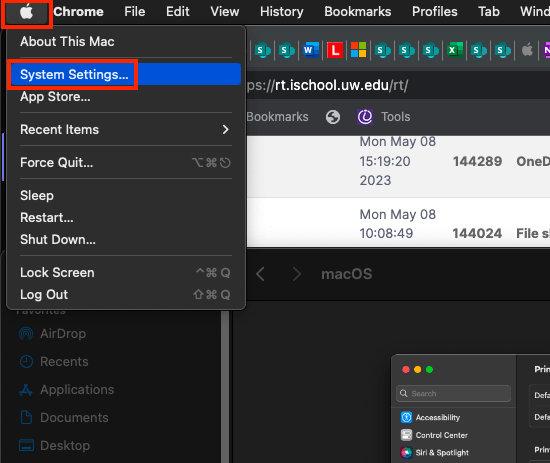
3. Click the top-left Apple icon. Click System Settings….

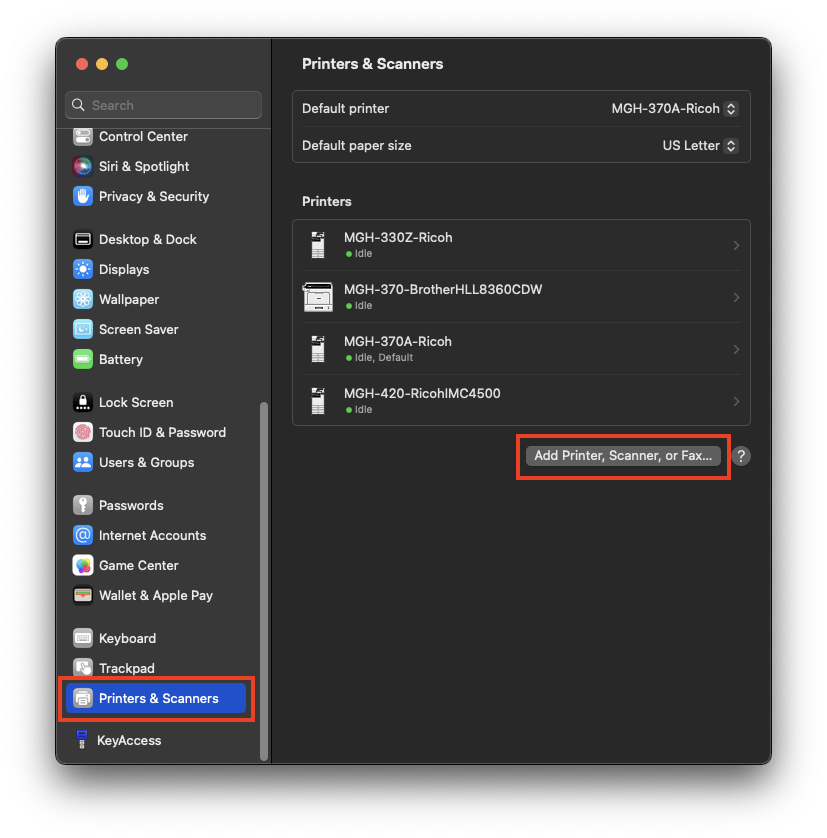
4. Click Printers & Scanners, click Add Printer, Scanner, or Fax….

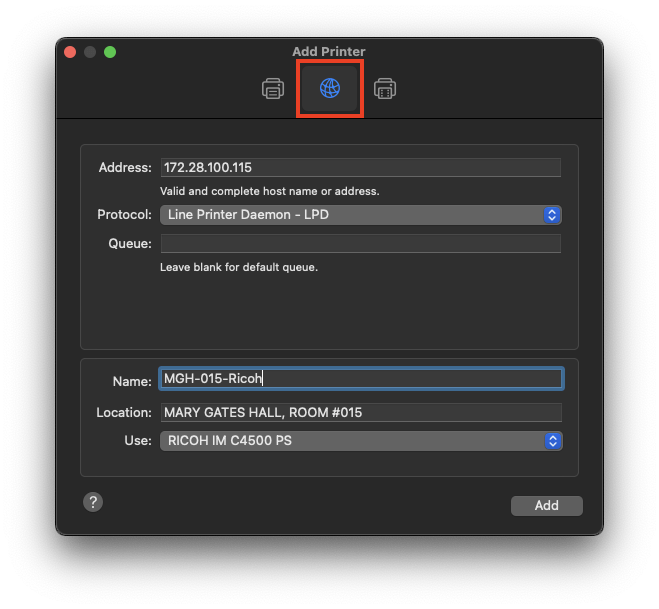
5. Click the IP button. Use the following settings:

Address: enter the IP address you found from step 1.

Protocol: Line Printer Daemon – LPD

Queue: leave blank

Name: can be anything you want, use something that makes it clear what it is

Location: gets filled in automatically

Use: *should* get selected automatically, if not, select the make and model of the printer

Click Add.

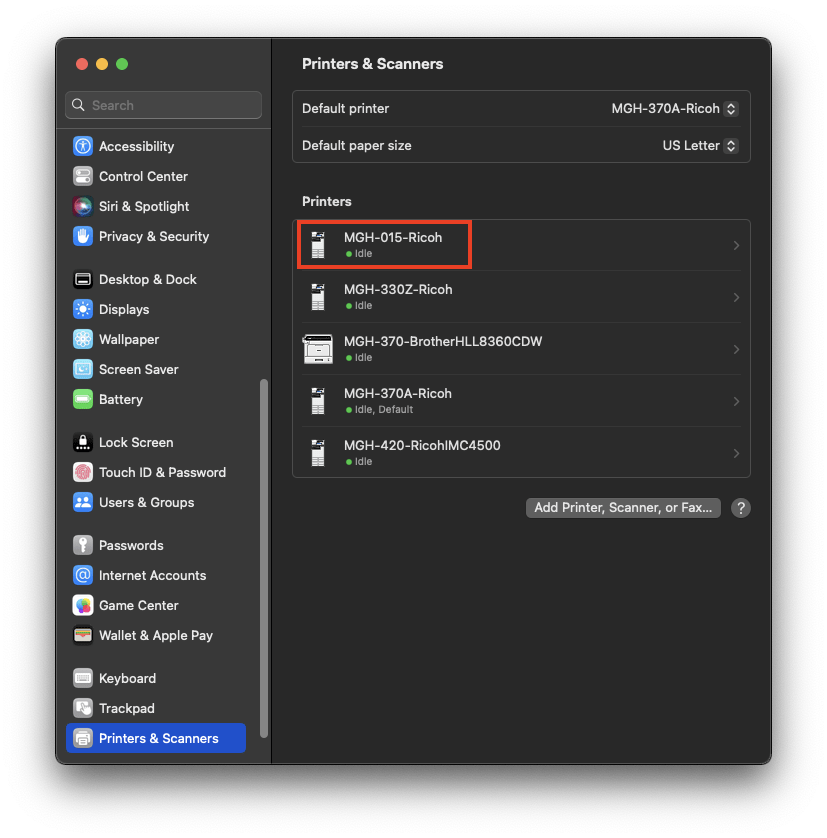
6. You should see the printer added with a green light indicating it is ready to print to.

Printing in the iSchool Computer Labs

Mary Gates Hall room 440 (MGH-440), sometimes referred to as “The TE Lab”, has a “Dawg Prints” pay-for-print system. From any computer, send your document to the MGH-440 Dawg Prints printer (or any Dawg Prints printer) by using the website: print.uw.edu.

Full instructions for using the Dawg Prints printing system are available on this website: Dawg Prints instructions.

If the printer in MGH-440 is out of paper, please notify IT personnel at the iSchool IT Help Desk in MGH-470.

All about iSchool backup (what, who, when, where, how, why)

The goal of backups performed by iSchool IT is to allow you to recover from a hardware disaster or transfer to a different computer easily and not to provide archival backups. We currently only backup iSchool-issued computers.


HOW

Files are backed up using an application named Code42/CrashPlan.


WHAT

All the default Windows and macOS user folders are backed up. This means:

on Windows, every file and folder under:

C:\Users\your UW NetID

and on Mac, every file and folder under:

/Users/your UW NetID

is getting backed up.

Sidenote – Although Code42/CrashPlan does backup Firefox and Chrome bookmarks modern web browsers provide a way to backup/synchronize bookmarks across different devices/computers . If you use Firefox or Chrome, we recommend you sign into the browser itself, using your UW email address and use the browser’s built-in sync feature to save all your bookmarks to the cloud:

set up Firefox sync
set up Chrome sync


WHO

All permanent iSchool faculty, staff, and PhD students that have been issued an iSchool computer will have said computer backed up via Code42/CrashPlan.

It is standard operating procedure to backup one computer per person.

If you are not a permanent employee and/or you are using a checkout or loaner computer your machine will not be backed up via Code42/CrashPlan. Please take appropriate actions to safeguard your data.


WHEN

The Code42/CrashPlan application will check for changes and make backups every fifteen (15) minutes.

For the Code42/CrashPlan application to work, your computer needs to be:

a) powered on (not in Sleep Mode)
b) connected to the Internet


WHERE

The Code42/CrashPlan application works whether your computer is on or off campus.

All files are copied/uploaded to a server accessible only by the iSchool IT team.

All files are stored on disk and none are copied to tape.


WHY

The goal of backups performed by iSchool IT via the Code42/CrashPlan application is to allow you to recover from a hardware disaster or transfer to a different computer easily.

Code42/CrashPlan does support some file versioning history by default.


RESTORE / RECOVER FILES

Basic instructions for recovering files from Code42/CrashPlan can be found here. Contact the iSchool IT Help Desk with questions.


UW-IT DOCUMENTATION

UW-IT Code42/CrashPlan documentation

Connecting to (Mapping or Mounting) the iSchool N Drive

Connecting to (Mapping or Mounting) the iSchool N Drive

The iSchool provides a shared collection of network storage folders commonly referred to as the N Drive (“N” for network). The following directions are for accessing the folders on the N Drive. The directions presuppose you have the correct permissions to access the N Drive folders. If you are unsure of your permissions to access the N Drive, or specific folders within the N Drive, please contact the iSchool IT Help Desk.

If you need to map or connect to the N Drive on your computer, use the following server addresses:

Windows: \\netid.washington.edu\ischool
macOS: smb://netid.washington.edu/ischool

Fully detailed instructions are below.


The N Drive is only accessible from the UW network. If the computer you are using is physically off campus, you must first connect to the Husky OnNet before you will be able to access the N Drive.


Access the N Drive using an iSchool issued computer

Access the N Drive using a personal computer


Access the N Drive using an iSchool issued computer
Windows 10
macOS


Windows 10

If you are off campus, connect to the Husky OnNet VPN.

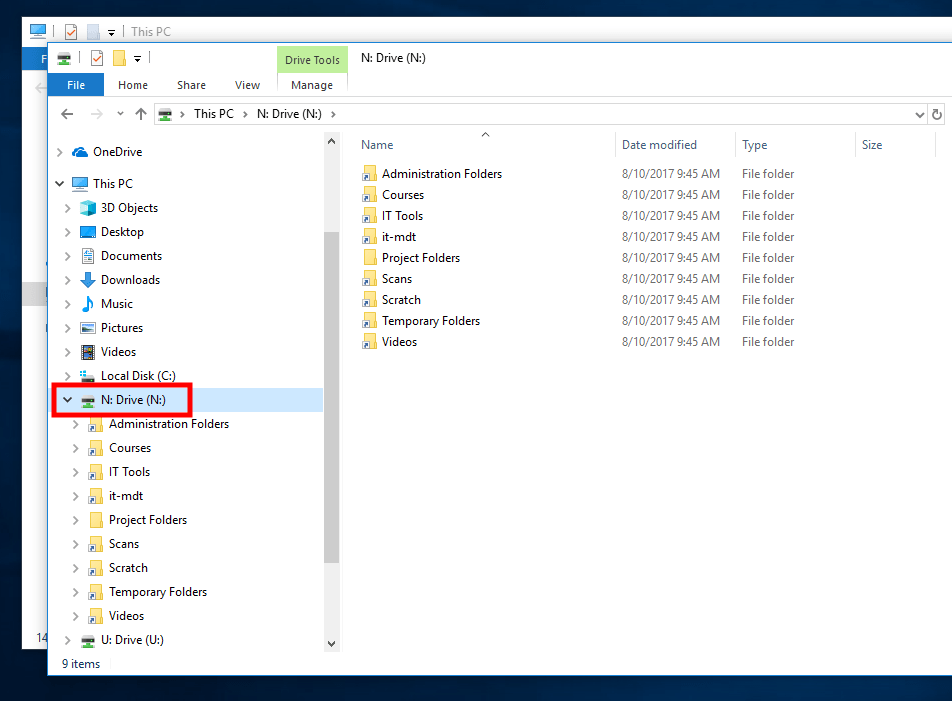
1) Click the Windows File Explorer button in the lower-left corner of the screen, click N Drive below This PC.

Windows 8 N: Drive Location


macOS

Follow the “personal computer” directions for macOS


Access the N Drive using a personal computer
Windows 10
macOS


Windows 10

If you are off campus, download, install, then connect to the Husky OnNet VPN.

1) Right-click the lower-left Windows icon, click File Explorer, click This PC, click Computer, click Map network drive.

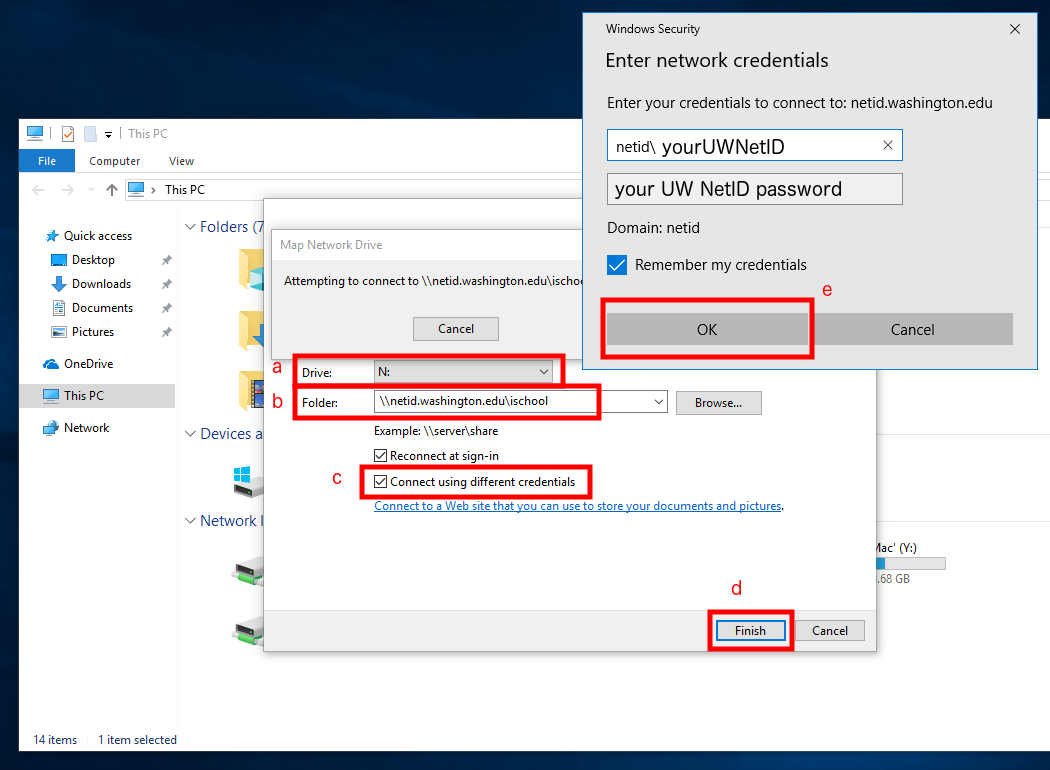
2) In the Map Network Drive window, for Drive: use N, for Folder: use \\netid.washington.edu\ischool, check Connect using different credentials, click Finish, for User name use the format netid\yourNetID, for Password use your NetID password, click OK.

3) The N Drive and its folders will appear below This PC.


macOS

If you are off campus, connect to the Husky OnNet VPN.

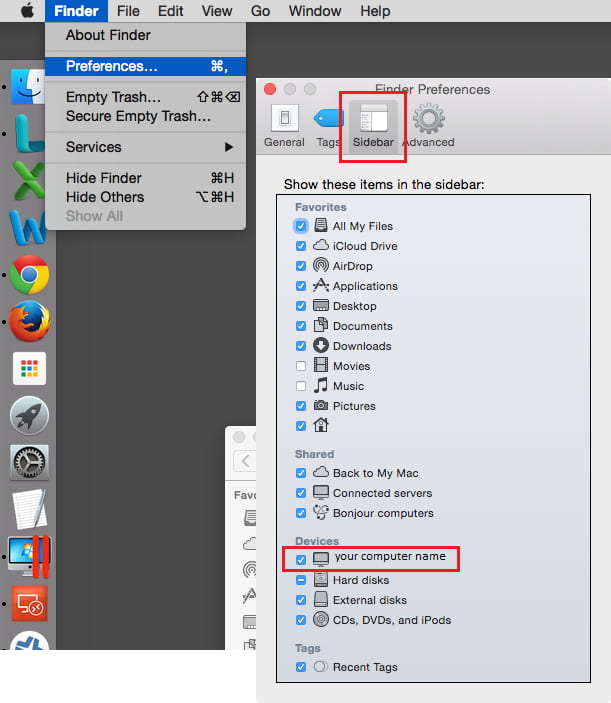
1) Open Finder, click Preferences…, click Sidebar, check the box next to your computer name, close the Finder Preferences window.

Finder Preferences

2) In Finder, click Go, click Connect to Server… (⌘ + K on your keyboard).

Finder -> Go -> Connect to Server...

3) For Server Address: use smb://netid.washington.edu/ischool, click the plus (+) button, click Connect, select Connect as: Registered User, for Name:, use netid\yourNetID, for Password: use your NetID password.

4) Finder will open a folder titled ischool with all of the N Drive folders, you can also find the N Drive folders in Finder by clicking your computer name -> ischool.

Deep Freeze/Administrative rights on lab computers security model

In order to give students at the iSchool the greatest possible flexibility in achieving their academic work, everyone who uses an iSchool lab computer is automatically logged in to that computer as a local administrator. This allows the user to have full permission to install software and to make any number of configuration changes to the computer’s operating system.

While The iSchool believes in providing an open learning environment, it also wants to give its lab users secure, reliable machines. For this reason, it has chosen to run Deep Freeze on all lab machines.

Deep Freeze is a program that restores a computer to a “fresh state” after each system reboot. Consequently, if you install a program on an iSchool lab machine and then reboot the machine, the program will no longer be installed when the machine restarts. Deep Freeze returns the computer to its original pristine state, so if you ever experience any problems with a lab computer they can be fixed by rebooting.

Using Deep Freeze ensures that our machines stay up and running with the least amount of interruptions due to accidental configuration changes, software bugs, spyware, malware, and viruses.